See the Windows 7 desktop. Install it on the desktop. Change of external appearance
Adjusting the design of Windows 7
You set various design parameters for the Worktable and any others at the time of installation operating system for example, background little ones (“trellises”). But this does not mean that such a background little one will torment you with its appearance forever. Everything can be changed. There is a difference between the new appearance of the windows and the sounds during various actions.
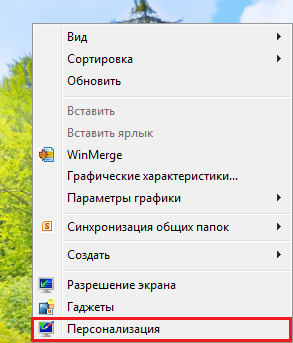
To change the design parameters of Windows 7, right-click on the right window and icons on the desktop (Fig. 2.33).
Rice. 2.33. Viklik window for customizing Windows design
Respect!
When changing various Windows settings, you will see that the items next to the settings are marked with an icon
(for example, buttons that click additional windows with settings). This means that you need system administrator rights to open this element. When installing the operating system, it is obligatory to create the account with administrator rights. If you are not an administrator, the system will not allow you to access the item indicated by the icon.
A. N. Lebedev. “Windows 7 and Office 2010. Computer for beginners. Back to work tomorrow"
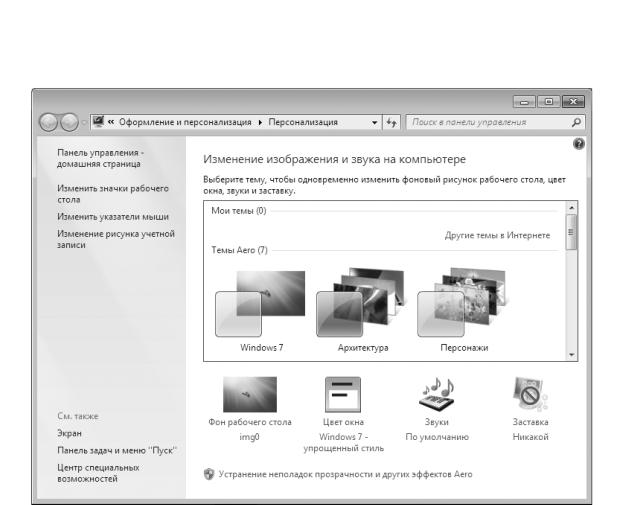
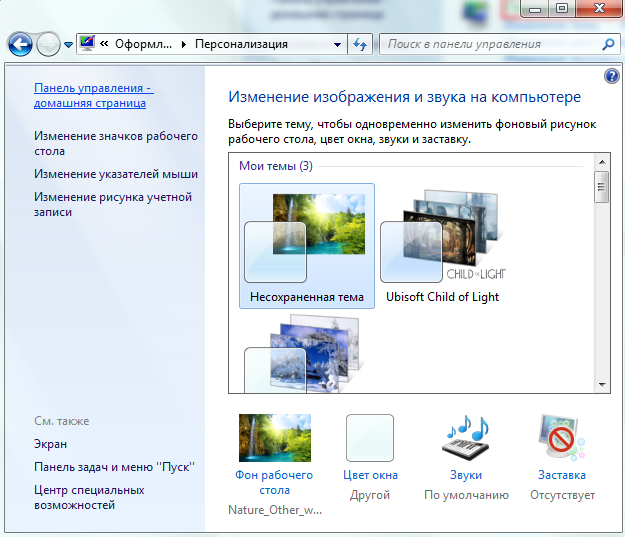
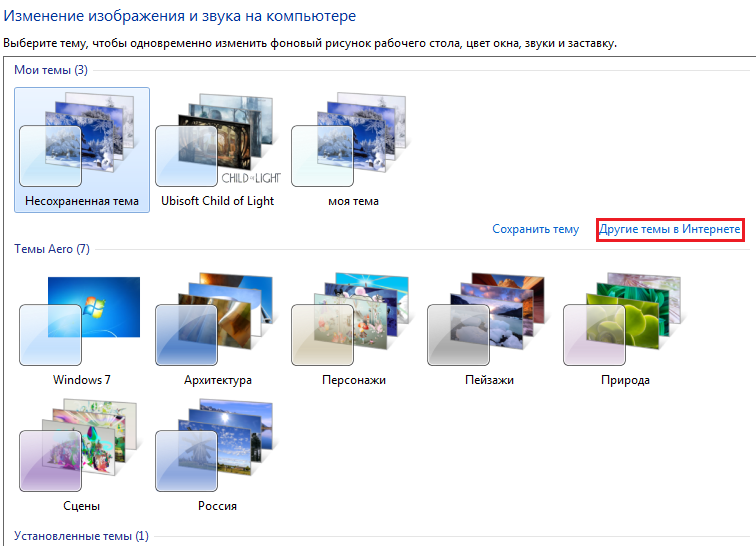
From the context menu, select Personalization. The window shown in Fig. 2.34.
Rice. 2.34. Personalization
Those
The theme of the design is a ready-made set of parameters for the screensaver, wallpapers of the work table, windows and sounds for various stages. You can configure all these parameters manually individually (we’ll look at how to do this later), or you can simply select a theme that suits you.
In the main field of the Personalization window, where you enter phrases with the word “theme”, the themes of Windows 7 are shown (for example, Windows 7, Architecture, Characters). You can select a topic by clicking on the topic icon or its name. Once you complete this, a similar topic will be included.
Change of external appearance
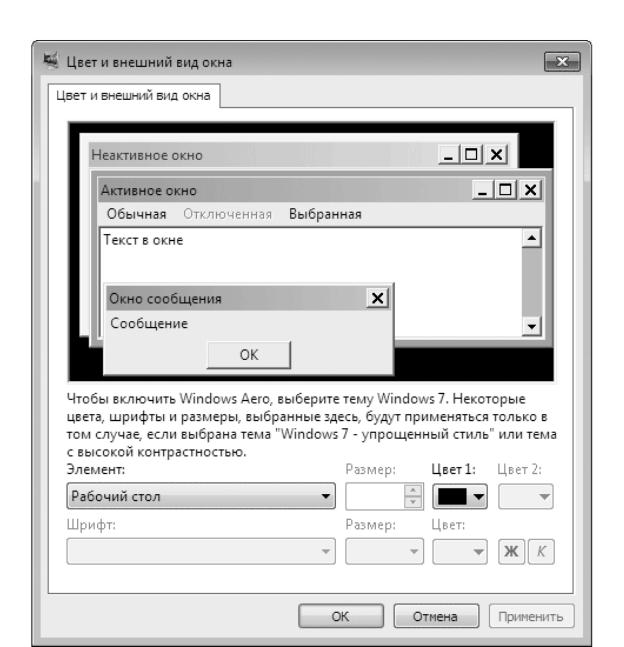
For change from the outside looking in On Windows 7, you need to click on the Window Color option.
This will open the Color window and the new appearance of the window (Fig. 2.35). In the rectangular field at the center of the display window there is an indication of the flow-through design of the display window and its elements. Under this field there is a list Element.
A. N. Lebedev. “Windows 7 and Office 2010. Computer for beginners. Back to work tomorrow"
Rice. 2.35. Color and appearance of the window From this list you can select the element of the window or desktop that you want
nalashtuvati. The last parameters of the selected element that can be changed will appear in the lower list that opens.
Background baby on the desktop
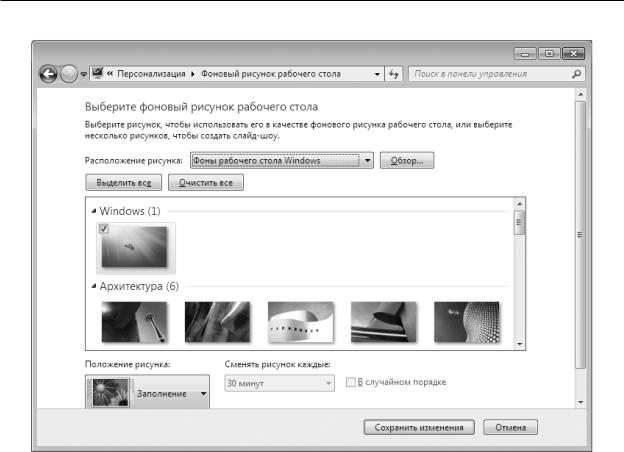
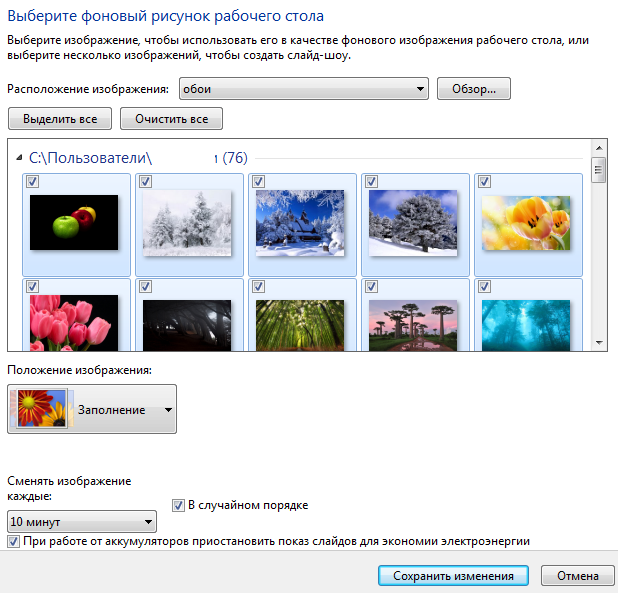
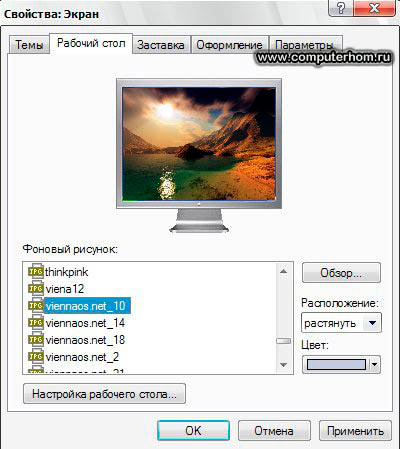
To select the option to customize the background icon of the Work Desk, you need to select the item Background of the Work Desk.
The window (Fig. 2.36) shows thumbnails (changes in the image) of various background babies. The developers of Windows 7 have done their best and have provided you with a variety of different little ones.
A. N. Lebedev. “Windows 7 and Office 2010. Computer for beginners. Back to work tomorrow"
Rice. 2.36. Adjusting the background little one on the work table
All these images are located in a special dad Windows desktop background. This can be seen in the list of Roztashuvannya baby. You can search for the little ones in several folders, some of which can be seen when you click on the list, which opens.
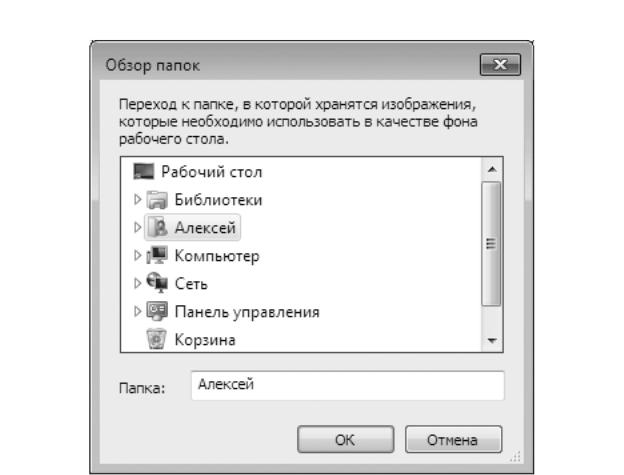
Perhaps you painted the little ones for your work table yourself? Or you have a photo on your hard drive, what is suitable for the background? You can select the background of your desktop, either from an image or from a file on your computer's hard drive. To do this, click the Look button. As a result, a folder selection window will open. Such windows will often come to your attention when working with various Windows 7 programs. An example of the folder opening window is shown in Fig. 2.37.
A. N. Lebedev. “Windows 7 and Office 2010. Computer for beginners. Back to work tomorrow"
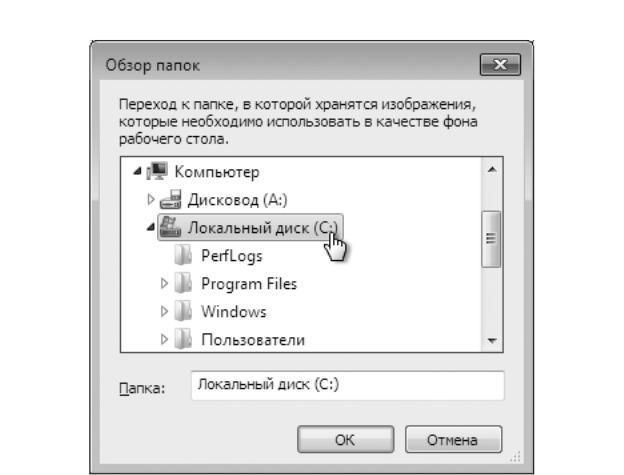
Rice. 2.37. When selecting a folder In the window that has opened, click on the mouse under the Computer folder
or behind the name of the folder itself. As a result, a list of logical drives on your computer’s hard drive will appear, as well as CD and DVD drives and other received storage information (Fig. 2.38).
![]()
A. N. Lebedev. “Windows 7 and Office 2010. Computer for beginners. Back to work tomorrow"
Rice. 2.38. List of logical drives Click on the name of the drive on which you saved the file with the little one. At
This will show you a list of folders on the selected disk (Fig. 2.39). If your folder with baby is in the middle of another folder, find the name of that folder and click on it. Once you know the folder with the picture, click on it with the mouse, and then click on the OK button. As a result, the small folder for this folder will appear in the window shown in Fig. 2.36, and you can choose any of them.
A. N. Lebedev. “Windows 7 and Office 2010. Computer for beginners. Back to work tomorrow"
Rice. 2.39. Disk C capacity:
You, of course, understand that the size of the baby may not be able to keep up with the screen. For how to place the background baby on the desktop, the Baby Position list is displayed. Proposed options: Backfill, Beyond the size, Stretch, Pave, Center.
From the pictures left-handedly, you can see from the various options for placing the baby how it will be. Rosebero kozhen vipadok.
Filling – the size of the image is adjusted vertically to save the proportion of the image so as to fill the entire work table.
By size – the size of the picture is adjusted horizontally to preserve the proportion of the image so as to fill the entire work table.
Stretch – the picture is stretched vertically and horizontally so as to fill the entire work table.
Pave – depending on the size of the picture smaller in size The work table is repeated extensively until the entire surface of the work table is covered.
In the center, the picture is displayed in the center of the work table in its original dimensions.
You can select an image. The stinks will change one after another after your instructions. To do this, select the mouse click first from the other images, and then press the Ctrl key on the keyboard and, without releasing them, click the mouse on the other images. As a result, all images you have marked will be marked with checkmarks. When the Change skin tags list becomes available, you can choose how often the skin tag is displayed.
The working environment in Windows 7 is different. As in advanced systems, every user who has a cloud record on the PC can customize the desktop, install a screensaver, choose the style of the window interface, sound circuit, the shape of cursors, etc., so that you can completely personalize the look of your “photo”. Microsoft has given this opportunity to users of the Home, Enterprise, Professional and Ultimate editions of Windows 7 by equipping the system with a personalization panel, through which everything is adjusted.
A short look at “Personalization”
There are two ways to open the program:
- right-click on an empty area of the screen and select “Personalization” from the menu;
- go to , click on the item “Design and personalization”
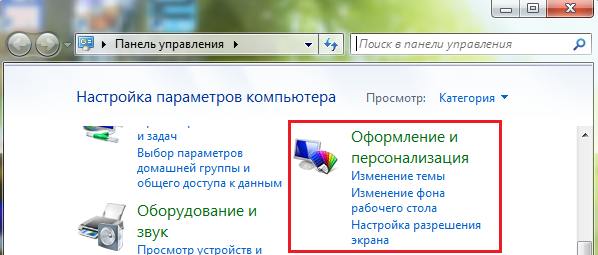
And in the middle of this section, select the same item again.

"Personalization" - this is where all the system design options are selected:
- those - sets that include trellises on the desktop (one or more images of similar themes), window styles, cursors, etc.;
- There are also elements for creating custom themes - screen background, window color, sounds and screensaver;
- section for changing icons that you can display or add to your desktop;
- select baby regional registration;
- select your target.
Installation on desktop
The themes of the Windows 7 personalization panel are divided into groups:
- Koristuvalnytskyi;
- Aero installed (with 3D and visual elements);
- installed basic (simplified).
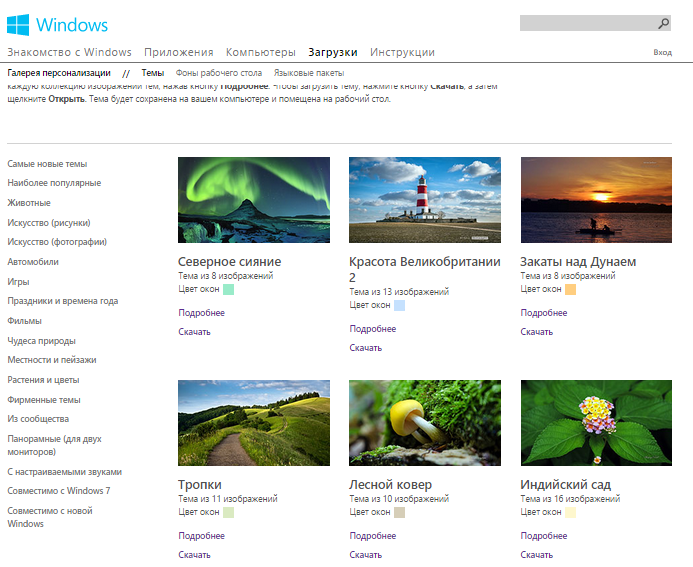
To select something ready, you just need to press on it - at the same time, the wallpaper of the work table and the style of the window will be changed. And if you want something else, from this window you can go to the personalization gallery on the Microsoft website and freely download a variety of new themes.
For whom:
- press the “More topics on the Internet” button;
- In the left menu of the page, select a thematic category, look through the catalog and at the bottom of those that suit you, press the “Enter” button.
Creation of power by those
To create custom themes, use the “Change image and sound” window in the lower part of the window next to the menu.
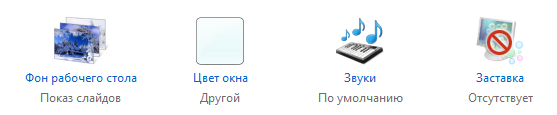
Little working table
To change the screen background, tap the first item. Here you have to go to any folder with pictures on your computer and select an image (one or a bunch) to decorate your desktop. To display pictures in the slide view, set the hour for changing frames and put the “short order” checkbox next to them.
Color and style vikon
The next step allows you to select the color and intensity of the display.
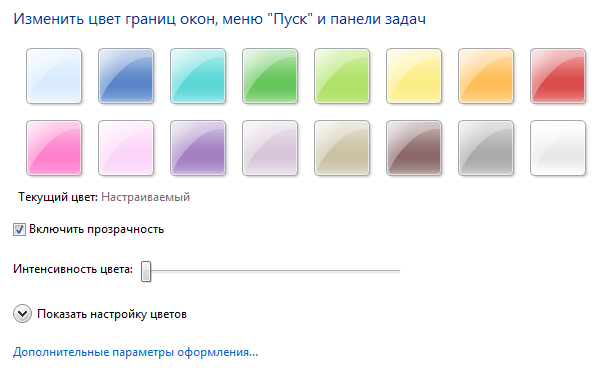
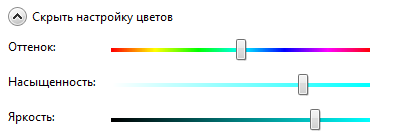
The brightness, tone and richness of the selected color can be adjusted by lighting the element of the “Show color adjustment” window.
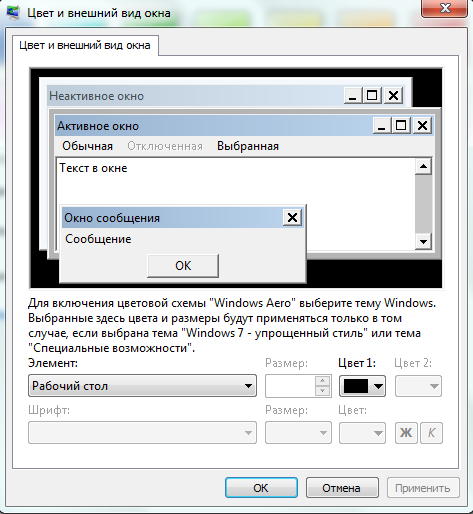
Other style elements can be edited in the “Additional design parameters” window. Here you can set your own fonts, color of tooltips, scrolling width and much more.
Sounds
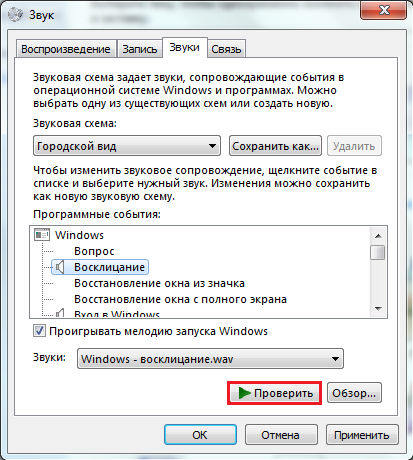
The “Sounds” item provides access to audio. Koristuvach can vibrate a ready-made sound scheme or create a sound. You can listen to audio files at this website.
To voice the sound, you can use any sound files in wav format.
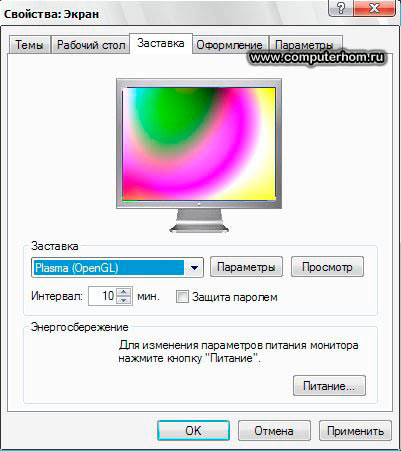
Screensaver
A screensaver is an animated image that can appear on the monitor when you log in and the computer is idle. To insert, press the same item.
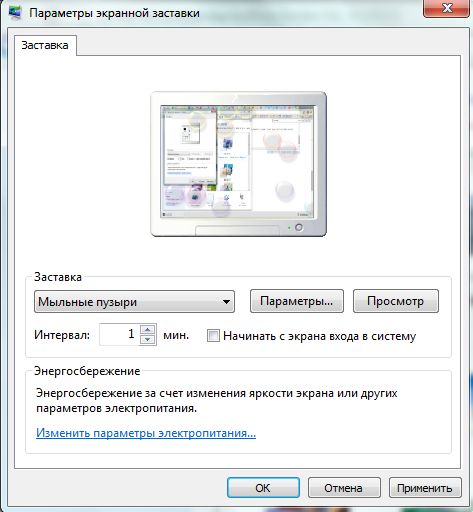
In the settings window, you can set the interval after how many weeks the screensaver will appear on the screen, as well as edit a number of parameters that are available. For example, you can change the speed of the animation, the font, whether the screensaver includes writing, etc.
Changing other design elements
Desktop icons
The work table behind the cabinet can display or not display the elements “Koshik”, “Computer”, “Merezha”, “Caravan Panel” and the folder for saving files in the cloud record.
To change these elements, click on the right menu of the personalization window and select “Change desktop icons.”
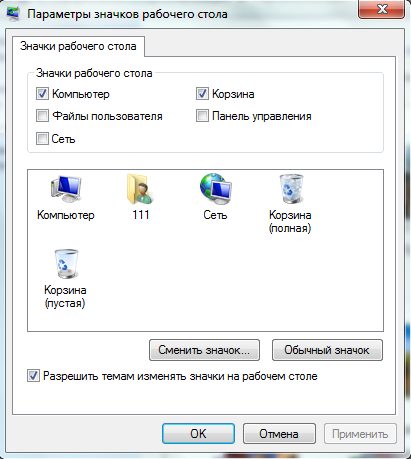
To enhance and disable the selected icons, it is enough to select or, for example, uncheck them. To change the icon image, you need to click “Change icon” and select a different one.
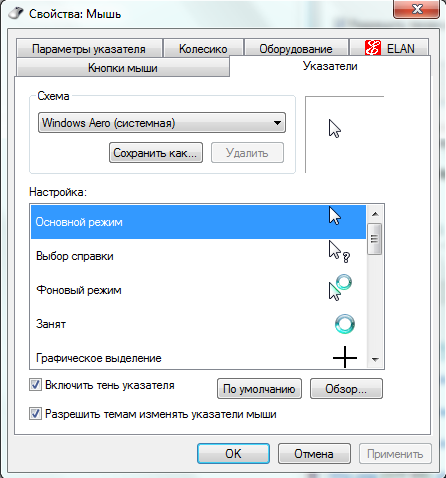
Changing the mouse cursor
To change the standard set of cursors, open the “Change mouse displays” menu. Here you can also choose one of the ready-made Windows 7 schemes or create your own, using any images in the cur and ani format.
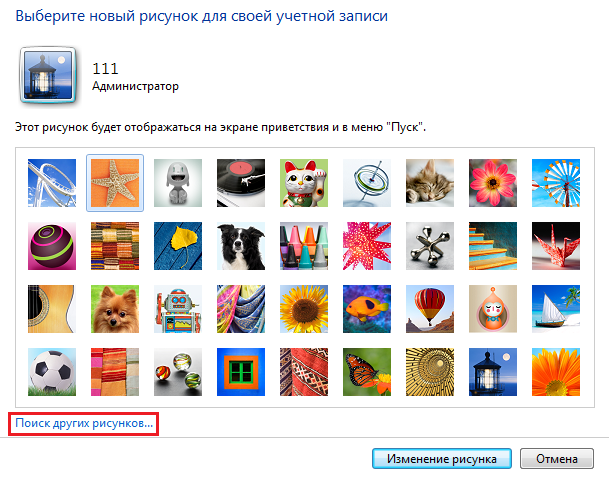
Installation of a small cloud recording
Access to changing the image of the cloud record can be accessed from the item “Changing the image of the cloud record”. You can select an image from a ready-made set, or by clicking “The sound of other little ones”, insert your own. For example, to the special officer, a photograph of the koristuvach.
So that Windows can be used manually, the Windows desktop can be customized to your satisfaction. You can change the screen size, set the desktop background, a screensaver to indicate that you are not working at the computer for a long time, desktop design elements, and also customize the new look of the Windows desktop.
To change the appearance of the Windows desktop, you need to close such actions on the free space of the Windows desktop, right-click the mouse button, and select the “power” command from the Windows menu. After this, open the dialog at the end of Windows - “Power: screen”.
This Windows window has a number of tabs that allow you to set the background of the Windows desktop, the Windows screensaver if you don’t work at the computer for a long time, elements of the design of the Windows desktop, a separate part of the Windows screen and so on.
On the first tab Themes On this tab you can install a theme for the Windows desktop. The theme of the Windows desktop is the design scheme of the desktop, sound effects, background images, screen saver, mouse display shape, as well as the new look of standard icons. As a result, all components are united in a single style, and the design turns out to be very beautiful.
The "Desktop" tab appears. Here you can change the Windows desktop background, change the Windows background. You can vikorist the ready-made little ones or create power. If you want to get rid of the domineering little one, use the Look button to indicate the de vin of spoiling. You can also place the little one in the center, stretch it across the entire screen, or pave it. From this tab you can also select the background color of the Windows desktop.
The "Screen Saver" tab appears. Here you can select the Windows screensaver, which will appear on the monitor screen, since you will not be working at the computer for an hour. You can also set time intervals after which the Windows screensaver will be turned on. You can view the Windows screensaver in the Forward View area, and if you want to view the screensaver enlarged to fill the entire screen, click the View button. The Windows screensaver will not appear when you start working with the computer, for example, move the mouse or press a key on the keyboard. You can set a password so that only you can remove the screen saver from your screen. In addition to customizing the screen saver, this tab allows you to customize the energy-saving functions of the monitor.
The "Design" tab appears. Here you can customize the appearance, color and size of fonts for Windows window headers and the names of menu commands.
To change the style of Windows windows and buttons, go to the "Windows and Buttons" tab. If you want to change the color scheme, go to the "Color Scheme" tab. To change the font size, you need to go to the "Font Size" tab to set effects click on "Effect" button.
![]()
The "Parameters" tab appears. Here you can change the size of the Windows desktop and the number of colors that are displayed on the screen. The larger the screen size, the more information can be placed on the monitor screen, and the more detailed the image elements will be. For work with large screen sizes, 1600 by 1200 pixels, you need monitors with a screen diagonal of at least nineteen inches. For monitors with a diagonal of fifteen inches, the separate size is 1024 by 768 pixels, for monitors with a diagonal of seventeen and nineteen inches, 1280 by 1024 pixels. Also, the limiting value of the separate data is to lie not only on the monitor, but also on the video card.
The amount of screen space can be changed using the Screen area slider. How many colors are displayed when you select a separate item to be stored on the video card. The list that appears The color palette allows you to select the depth of color. The minimum number of bits required for normal operation is sixteen bits. After completing the adjustment of the separate parts of the screen, press the “OK” button.
Every computer user knows that the Windows operating system, no matter what version, has a desktop. Most of them know or would like to know what it means and where to be. The “Desktop” is the main area of the screen, which appears immediately after you open the computer and enter the operating system. However, everyone does not know that the “Desktop”, in addition to everything else, is a folder or directory that contains program shortcuts, files and folders with subfolders and files. If this is a directory, then How to find the “Desktop” folder in Windows 7? At first glance, the restaurant appears to be a dry goods store for active koristuvachs. It’s not easy for beginners to rush with such a concept. Therefore, very early on, you may need to reinstall the Windows 7 system with a previous format of the local disk. It is therefore important to know where the “Desktop” folder is organized, so as not to waste the important files that are in it.
How to find the “Desktop” folder in Windows 7
Yak Vi already guessed "Desktop" folder in Windows 7 Other versions of the system are installed on the same local disk as the system itself, on the “C:” drive. Therefore, it is very important before reinstalling the operating system to transfer all necessary information from the local drive C: to another drive, for example, to D:. Let's take a look How to find the “Desktop” folder for the help of a standard explorer. To do this, you need to press the “WIN” + “E” keys on the keyboard or press the double clicks on the “Computer” icon located on the “Desktop” or in the “Start” menu. You can also launch Explorer from the “Setup Panel and Start Menu” - there the Explorer icon is attached to the icon next to the folder.
A guide will appear before you, for whose assistance I will show you the absolute path of growth Desktop folders in Windows 7, which can be done quickly in other explorers, such as Total Commander. Next, click on the “Computer” icon at the left side of the Explorer window once with the left mouse button. The right hand will display all the disks of the computer. Then click on the drive with the operating system, marked with the Microsoft company icon (for example, drive C:\). 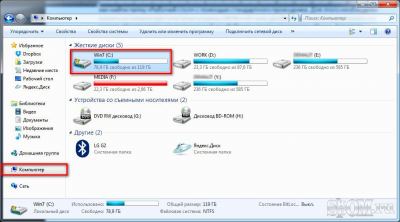
There will be only one folder in the middle of the C:\ drive - Koristuvachi (or Users). Click on them with the left mouse button to open them. 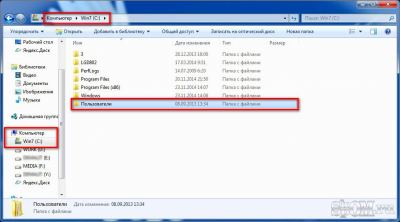
You will create folders with the names of all the accountants in your system and the “Background” folder. Open the folder containing your name (the name of the client). 
Directory with the name of the correspondent and the place, where the “Desktop” folder is expanded. And you're already studying. Since your language system is not Russian, but English, and because you are using, say, the Total Commander explorer, the “Desktop” folder is called “Desktop”. 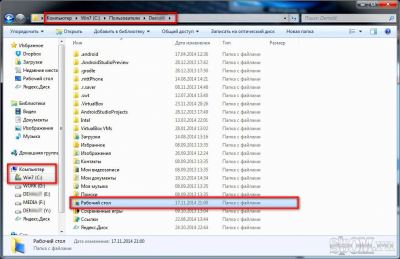
Enter, the first absolute path to the “Work Desk” folder looks like this:
"C:\Users\Im'ya_koristuvacha\Desktop"
Now at any time you can find the “Desktop” folder for more manual robots with the folders and files present in it. Be on the tee with your computer!
The desktop operating system Windows 7 has seen significant changes both in functionality and in its appearance. How to compare your capabilities with the peculiarities of the work table at the front Windows versions, it is possible to count the actual progress. For example, the “Power” item from the context menu has been replaced with new options with expanded functions. Gadgets for the Windows 7 desktop have appeared - a great alternative to the already existing mini-add-ons of Windows Vista. The advantage of gadgets is that they can be placed on the work table, where it is handy for the handyman. Modify the Windows 7 desktop so that it becomes more comfortable, easier and faster to use. Previously, changing the parameters of individual screens was available through the screen authorities window, which increased the number of actions. Now you can work through the context menu, where this option is indicated separately. The appearance of the window is adjusted to the individual buildings as well as a few changes.
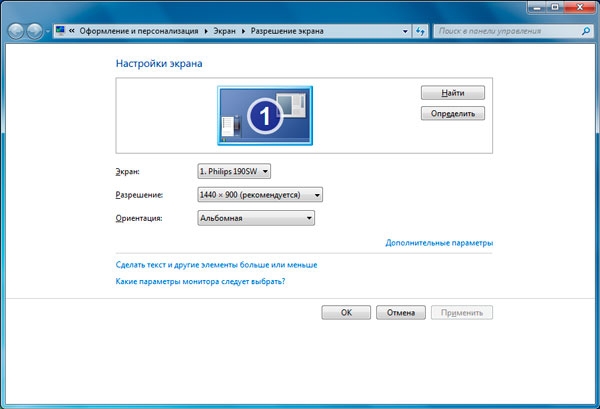
The “Advanced settings” option opens a window with information about the monitor and video adapter, plus there is a tab that allows you to change colors. 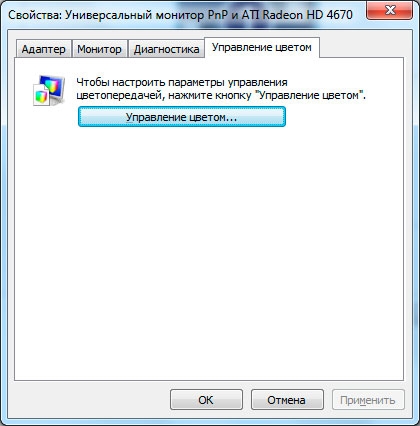
The “Color Change” button allows you to customize display color profiles, allowing access to various parameters that are of particular interest to professional designers, photographers and artists. You can have it for the bazhannyam experiment with the new look of the Windows 7 desktop, variable sizes of labels, fonts and other objects. For this help, the message “Get text and other elements more or less” is displayed in the window, where we changed the separate part of the screen. 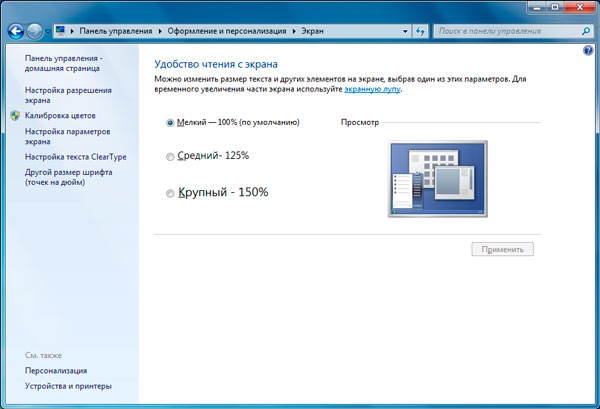
In Windows 7, for the convenience of users, the entire set of desktop locations in the panel is divided into two groups, called “Personalization” and “Screen”. 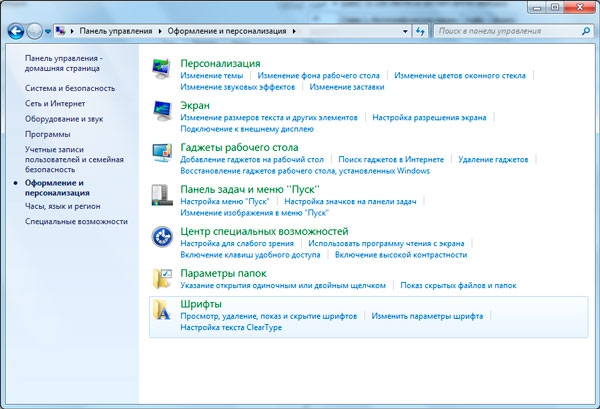
The “Screen” group includes the following options: selecting text sizes, icons and other desktop elements, changing resolution. Another group – “Personalization” – has other functions. Click on the name with your bear. 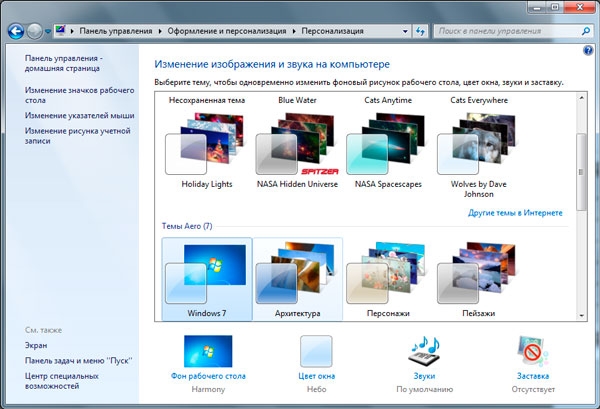
In the window that appears, you can adjust various parameters of the desktop: background, color, etc., select one of the themes of the Windows 7 desktop from the views in the folder, or select a new one, including both images and pictures. photo from Vlasny archive. Windows 7 has a whole range of ready-made themes that are available after installing the operating system. Among them, it is enough to select whether in the window to set up personalization, so that it ends up on the desktop. By clicking on the “More topics on the Internet” button, you know that you will be interested in everything else. The themes are based on the background and color of your desktop window. The background of the Windows 7 desktop can be whatever you want, just click on the main message, as shown below in the gallery of themes. 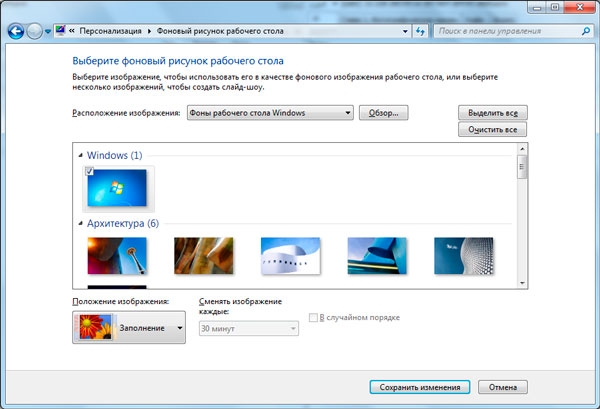
In the top row of the window you can see a number of backgrounds for the selected topics. Place one or more of them on the bear's presses, and you will see a check mark appear on the selected image. If you don’t mind swearing in the background, try setting up an automatic drawing, indicating how often the background changes and in what order – consistently and randomly. Backgrounds are available from a wide range of Windows 7 themes and those found in the image library, as well as photographs collected on your computer. A single-color body of any color is installed under the additional option “Single colors” in the drop-down list “Image colorization” when clicked. You can also pay attention to the nuances of design and change the color of the Windows 7 desktop window by clicking on the corresponding button in the personalization settings window. 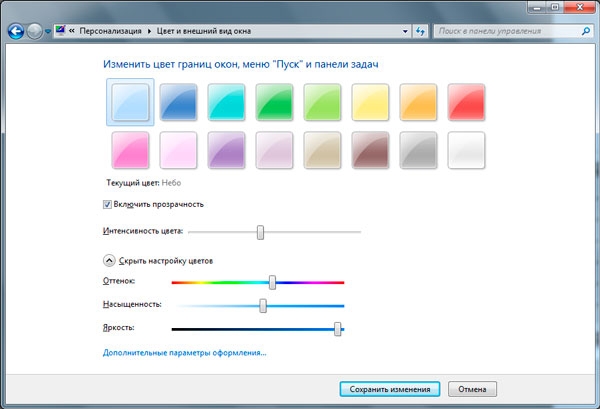
Here the templates are ready, which, if necessary, can be modified by dragging the steps left and right in order to achieve the most accurate fit. Customizing the desktop screensaver in Windows 7 does not affect what Windows XP already had. You can select the required parameters from the window where you can make changes.


