Easy DIY games for children. Make viruses with your own hands from improvised means in your own home. Original fruit and vegetable viruses
We have a wonderful idea - a “charming bag” with all sorts of things, where we have collected games for children, made with our own hands, which will forever occupy your restlessness. So roll up your sleeves and get ready to have a wonderful weekend with the kids and our game ideas for little ones with special needs.
We present to you a bunch of ideas that you can do to keep your child occupied at home if she is in need and has had all the toys for a long time. In this case, you won’t have to spend a lot of money on new games; it will be enough to have what’s on hand to create new fun for children with your own hands.
10 DIY games for kids to keep kids occupied at home
A selection of interesting games that you can make with your own hands to keep them at home.
Illusion of painting
Children love to be small, even if they seem so big, this always causes stress for their mother. If you don’t know what to do with your baby at home, give her a mixture of white paper, colorful leaves, pencils and a small container of water.
In the enclosed penzlik near the water and tiny behind the colored paper. The paper will be dark, where the water will drain, and your child will think what she is painting. There will be no disasters at the apartment.

DIY construction kit for children
How do you keep the child occupied at home since she's about three? Children like this simply love toys with minimal details.

For example, Mr. Potato. Create potatoes from felt, and also create from felt other colors for your eyes, nose, nose, nose and other attributes. You can carry it with you in your bag or leave it at home, and in case of emergency, Mr. Potato will bring you endless joy. It’s hard to come up with the most beautiful games for little ones.

Another option is possible.
Shpigunskaya dance - do-it-yourself game for children
Everything you need is good enough to rummage through your scavenger hunt for all sorts of unnecessary items: pipes, toys, thimbles, keys. Take a photo of them, spread them out on the table, then put them in a bowl and cover them with rice or other grains.
Whenever you need it, give the child a photo and ask her to find all the elements in the picture. You can create such games for little ones with your own hands again and again.

Games for children with a frosting stick
A great way to keep children occupied at home.
Unfold the little ones in different geometric shapes (triquet, square, rhombus) and let your child, vikorist and the little ones, try to fold the same figure into a stick. It’s not so easy to use up frost sticks to replace the sticks you need.

You can also make a puzzle using a frosting stick. For three more sticks from the frost (or use the same as for the figurines, but also on the side of the back). Cut up the photo into strips and glue it to sticks. Your little one can put together a puzzle if the picture appears. The advantage of these toys for babies is that they don’t have to spend or buy, and it’s also easy to get a new one.

Play lacing with your own hands
A great idea to keep your child occupied at home is to decorate the item with the cards that you can. insert the lace. Place the figures on foam rubber, cardboard or paper plates, making openings along the edges. Give the child a small motuzka so she can breathe through it and open it.

With the same success, you can use cocktail straws or fluffy cords instead of cords and paper instead of cardboard to keep your child at home at any time.
Play with plastic utensils with your own hands
As a matter of fact, every mother has plastic spoons and glasses from any kind of stuff lying around her house. You can also use them to create educational games for little ones with your own hands.
Take a bunch of clear, white and colorful plastic spoons. Finally, with a marker, paint on one color and one vision of the same size. On the back of the spoons also paint various figures following this principle.
Sensory games for children so that your child can identify two spoons with the same symbol and place them one on top of the other. It’s not only lying to you that you don’t know what to do with your child at home, or how to start dissecting figurines.

You can do the same with plastic cups. Such games can keep your little one occupied at home for a long time.
Stringed pasta
We all thought that as children would labor here in their classes, why shouldn’t they play with dry pasta at home.
Give the child pasta, in which there is an opening, and a skein, tying a large bag at one end so that the pasta does not fall off. Children can make it with us or just long-term binding of pasta of different shapes and colors.
You can also string the pasta onto sticks or sticks embedded in a plasticine or polystyrene base. You can also replace pasta with other materials: colored beads or cardboard.


Sorting squares of colored cardboard
Another activity that not only encourages, but also develops. To make this DIY game for children, buy colored cardboard, cut it into small squares of different colors and pin it. Lay out a palette of colors in front of the child and don’t forget to pin a square of cardboard in the desired color. This is a fun and educational game for little ones.

Modeling figures with your own hands
To keep your child at home without much waste, give her plasticine and toothpicks (this is the natural version of playing with marshmallows and straws) and create three-dimensional shapes using vicor and plasticine for joining sticks.

Play with cardboard boxes with your own hands
In order to keep the child occupied at home, work for her at home. The box itself can be converted into a table football with the help of some cocktail straws. And the lid is at the labyrinth for the ball: just glue the frosting sticks and cocktail tubes to the box.

Play with the dormouse light
Place it on the paper and instruct the children to trace the shadow behind the outline.

Virobi from colorful paper
Making a colorful paper is an easy way to keep your child occupied for a long time. It’s not necessary to be more specific; you can simply select different shapes (cuts, circles, squares, rectangles, tricutlets) and let the child fantasize.

Play with water
A quick way to keep your baby occupied at home without much fuss with the adults: pour water into a basin, fill with other objects (little caps, plastic bowls, balls) and give them to the baby using a stick, spoon, or ladle.

Smuga pereshkod budinka
Take colored tape, electrical tape or a painter's stitch, stick it on the base where the tracks and islands look like. Then, to keep the kids occupied, instruct them to cross the line or drive forward with toy cars, roll the soft ball along the road, blowing on the new one through a cocktail straw.

Funny little babies and collages made from available materials
A simple recipe for keeping a child at home for some help with painting. Just give him unnecessary magazines, advertising brochures and old leaflets, knives, glue, paper and olives. Next, the child visualizes her favorite characters, sticks them on a clean arch and paints those that she needs.
Such games not only help to keep the child occupied so that she is not bothered at home, but also develops imagination and trains fine motor skills.


Now you know what to do with your baby at home and what toys for your little one you can just make with your own hands.
Viruses for children 3-4 years old, made from paper with your own hands, may be different. A variety of applications, souvenirs, toys to develop. Children, with the help of their fathers, create important works of art.
Original apple tree
To grow an unexpected tree into the strength of any child. For work, a minimum list of materials and a little patience will be required. As a result, the baby will spend an hour in the bark and will be able to pick an apple tree on its own. Such a tree will become the right color in the room, as I remember about the flower master class.
Materials for robots:
- knives;
- a roll of toilet paper;
- papier green color;
- farbi;
- penzlik;
- glue.
- A roll of toilet paper stands up against the trunk of a mighty tree. We need to prepare it first. The burnt roll is cut into several pieces, thereby forming the wood.
- On the arkush we paint small colas with farbs, which will be apples.
- The leaf is carefully crumpled and glued to the animal’s trunk.
- The apple tree is ready, you can cook for it in a small place in the booth. If there is a fruit tree, you can harvest a bunch of trees and create a fresh apple orchard.
Are you preparing viruses from paper?
Vote
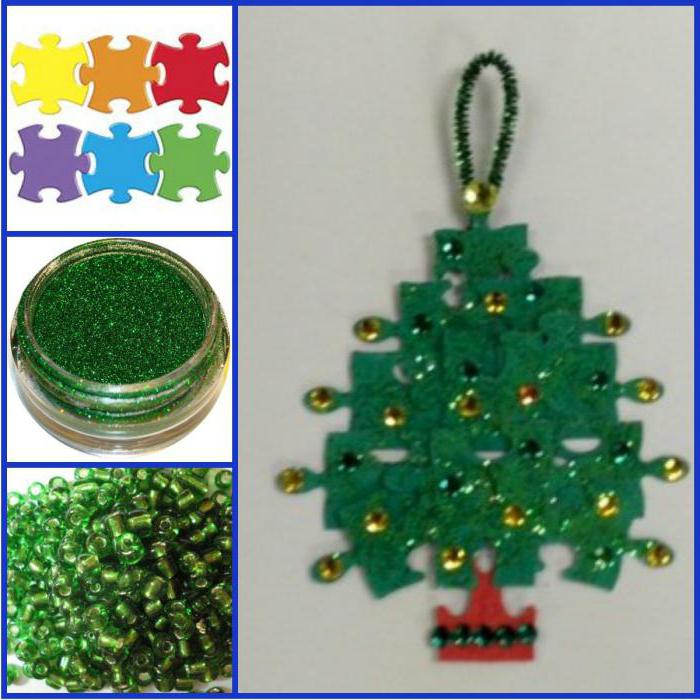
Yalinka from the puzzle
Every child can recognize details like an old puzzle. Yes, of course, you can throw it out, and best of all, give the speech a new life. Using your imagination, using unnecessary parts, you can create with your own hands a vibrator from a paper for children aged 3-4 years. Before work, I need to connect and I’m small. There will be stench in the creative process.

Materials for robots:
- puzzle pieces;
- farba green, brown color;
- sparkles;
- rhinestones;
- hair;
- beads;
- glue.
Viconnian sequence:

- The puzzle pieces are prepared with green paint and sprinkled with glitter.
- We glue the parts together in a yalinka shape.
- Robimo stovbur. For this purpose we prepare the parts with brown paint. We attach the drill to the base of the tree.
- As soon as the yarn is picked, we begin to decorate it. For which there are a variety of decorative elements.
- We make a loop of hair and decorate it with beads. We attach the hair until the finished product.
- Such a vibrator can be hung on a yalinka and used as a vikon robot.
Funny Misha on a plate
Paper's viruses are even more popular. Young children are of particular interest. The kids are happy to take part in the creative process and experience satisfaction with their work. It’s easy to finish the bowl on a plate. It is enough to prepare the necessary tools and stock up on supplies. Such a toy will take a great place in the booth and will become a decoration in the room.

Materials for robots:
- papier;
- felt-tip pens;
- disposable plate;
- knives;
- glue;
- threads
Viconnian sequence:

- We mark the paper and decorate it with felt-tip pens.
- The shape is cut out, molded into a cone and glued.
- We can see from the paper of the ear and eyes. They are decorated with other colors. We glue the parts up to the cone.
- We attach a thread to the mouse. There will be a tail.
- We secure the liquid on a disposable plate.
Valise with a secret
Paper eggs, made with your own hands, are of particular interest to children aged 3-4 years. The little ones are delighted to see, glue, and decorate the paper bags. In order for the master class to be collected, the fathers will be able to join in before work.

Materials for robots:
- sourberry boxes;
- glue;
- felt-tip pens;
- color papier.
Vikonanny technique:
- For robots you need at least 4 boxes. It’s better to prepare more of them, 10 pieces will be enough.
- We glue the boxes.
- The unbreakable part is wrapped in colored paper and carefully glued.
- We embellish the rejection of violence to the authorities. The little ones painted with felt-tip pens look original. You can add decorative elements.
Merry bunnies
Children 3-4 years old can already cut with scissors. This means that stinks can independently create happy bunnies. Funny toys will become a wonderful decoration for the daytime, and will remind the children about the time they spent.

Materials for robots:
- color papier;
- knives;
- glue;
- ruler;
- felt-tip pens.
Vikonanny technique:
- We paint the contours of the dark on the colored paper, carefully marking them. The stitches are of the same width.
- Let's collect a hare. We glue it together with a ring - this will be the head.
- We attach the ears and attach them to the head.
- To create paws, take wide dark layers and make cuts at the bottom. We attach the paws to the sheepskin.
- I use a felt-tip pen to draw on the eyes.

You can supplement the robot with grass. For which it is enough to plant a green color from the paper and plant a hare in the grass.
Application on the theme of fishing
To please your child with barvy characters, you can create paper fish. For whom it is not necessary to spend a lot of time. All you have to do is take the necessary materials and get the baby ready. The child, satisfied with all her work, finishes her work independently.

Materials for robots:
- cardboard;
- color papier;
- plate;
- ruler;
- knives;
- olive;
- confetti;
- glue.
Viconnian sequence:
- Painted on paper colo. To ensure that the figure comes out smooth, quickly roll it with a plate. Just put them on a sheet and circle them with an olive.
- This means the sector. Wine may be approximately 1/6 of the entire stake.
- The assignment sector is visible. Tse will be tulub ribi.
- A heart is cut out of the paper and attached from the bottom to the toulub. This is how the tail comes out.
- We decorate the fish for the best judgment. You can spread it with glue and sprinkle it with different colored candies.
Paper's toad
Master classes for children 3-4 years of age allow you to work with paper with your own hands. A toy that looks like a toad will bring great joy to the child. With this help you can control the theater show and collect all household members from the family stake.

The toad has rightfully deserved to be called the simplest origami model. We will prepare a whole bunch of linear vigin and virib.
Materials for robots:
- arkush paper of green and red color;
- glue;
- felt-tip pens.
Viconnian sequence:

- We take a leaf of green color and place it on the table in a vertical position.
- Visually divide the sheet into 3 parts, making visible the vigin lines.
- The upright cutlet is suddenly overturned. It is your fault to get rid of the line and die uphill.
- The bottom edge is folded up and the figure is turned over. Repeat until you get a kind of accordion.
- We cut out a tongue from a red paper and glue it to the paper.
- I draw on the eye with a black felt-tip pen.
Curcha with a crumpled paper
It's not difficult to make money. This can be done by young children who have never taken part in the creative process before. The kids will happily start crushing the papiers. This is great fun for them. It would seem that you could make money from crumpled arches without throwing them away. Ale masters came up with a way to extract, they vikorized papier for vykonannya toys.

Materials for robots:
- double-sided color paper;
- glue;
- crumbly eyes.
Viconnian sequence:
- Beremo arkush paper. The fragments are timidly curly, there may be a yellow color. It is not good to choose thick leaves; a child cannot deal with them on his own.
- The folder menu is turned over to another side, and the menu is changed again. Let's burn the papier at the cooler.
- The same is done with sheets of green color, and at the end we give it a galley shape. Let's plant a curly hair on it.
- From the red paper we cut out the trikutnik and glue it to the tube.
- My eyes are still strong.
- We cut 2 wings from the same sheets and glue them to the sides.

The chicken is ready, you can come up with a great game.
Paper's lighters
Viruses from paper, made with your own hands, are gaining great popularity. For children aged 3-4 years, there are a lot of master classes. Fathers can easily pick up this lesson and make an original toy with their little one.
Paper's lithtars are still in plain sight. The brightly colored hoops, fastened together, acted as a wonderful decoration for the booth. They could be seen at a newborn’s holy day or a child’s holy day. Likhtariki remain relevant today. The kids are happy to start working and decorate with joy.

Materials for robots:
- color paper of two colors;
- thin stitch;
- glue;
- olive;
- cup;
- knives.
Viconnian sequence:
- There is cola on the colored paper. For this purpose, it is enough to place a cup on the arch and surround it with an olive.
- Carefully check the stake.
- It's easy to draw out the figure completely.
- Let's start collecting the virus. The stake is melted and coated with glue on one side. Before this we attach 2 bent stakes, again coated with glue. This method is used to create a garland.
- We make a stitch at the center and glue the flared circle. Next, 2 bent pieces are glued again.
- We straighten the pellets.

- In order to earn ligths, you will have to stock up on terpines. It’s best to involve the whole family before the process. Allow the robot to finish quickly, and as a result you will get a perfect new garland.
- To ensure that the likhtars do not stick together during the hour, you can string the pasta onto a string. This will help you develop a construction that is valuable and extend its term of service.
- The stories in the paper for children 3-4 years of age may vary. Vikonati with their own hands is not a stock of difficult things. Once you have sufficiently prepared the necessary materials, you can start working.
If you connect everything to the creative process, you will be able to create a lot more original viruses. As a result, you will be able to spend an hour with the measles, decorate the booths with fruits and let the little ones show off their cuteness. The child, pleased to take part in the work, shares a lot of powerful ideas with the creation of toys.
What kind of viruses can you work with river grass? As practice has shown, there are a lot of different things.
We started with the application. At first there were just little flowers of different colors, which my daughter stuck to the back of her white paper. Once my daughter got the hang of using olive glue, we started adding hearts and leaves to them.
Our application has already gone off with a bang. Let’s tear up the servette at once - it’s so much fun! :)
The axis of many of our robots is working, so move it “from early” :)
1. These are our first reports on the application. We have accumulated an unhealed number of such “clearings”. We started creating around 1 p.m. 2 months This robot is, one might say, pushed through. There are plasticine middles and leaves.
The child has already quickly realized that everything needs to be glued. I was just beginning to see it.
The three parts have been dissected from the middles of the buds - now the stickiness of them is completely distributed in the right place.
And then I found countless little flowers... and off I went!
2 "Little Pot". They paid for the child for 1 ruble. 3 months
I made a little mark. She gave the child bags (peacocks) and she stuck them wherever she wanted. Then they tore the paper towel at once. The child smeared and helped herself with glue (her mother helped here). And they sniffled with their tattered clothes. Beauty!

3. Mitten." They paid for work at the children's center, at 1.5 p.m.

4. And this is already “developing”, one might say.
Zadannya: red knitted pieces glued to the pear, yellow squares to the apple. It was important not to get confused and it was important not to miss the delivery of fruits:) They paid for 1 rub. 7 months

5. "Day and Nich." Find out and stick what happens day and night. They charged about 1.9 rubles.


6. “Solinya.” In a jar we have cucumbers, tomatoes and peppers.

7. "Kompotik". We developed the theme of “saltery”. Here we have a half-day, the cherry is angry.

8. They paid for the donka at 1 rub. 7 months
The birds were flying from a double-sided paper. And she glued it to that side, whichever you look at. Zgod, because The child wanted to do something, her eyes were sore. One eye became a wing... I gave the child some more plasticine, and so the little birds got wings.

9. Robbed 1.5 roka. My daughter glued the details from the paper: my mother suggested the mushroom and blizzard, but it’s up to the authorities to judge. She rolled balls and cowboys. Z Kovbaski Viishov Ravlik. And the bags became the middle of the white flowers, the sides of the rake, and the speckles of the mushroom - it molded itself.

10. Robbed at the same time at the children's center, at 1 rub. 3 months

11. Kviti – our favorite topic. My daughter chose where to glue the flowers (1.5 years).
I myself thought that it was not important to decorate a vase with flowers. I glued the vase and stems myself, but I told you where to go.

In addition to rich adults, small children should never sit on a seat. The stench simply cannot stand the boredom and I want to do something all the time. One way to keep the baby busy is to prepare eggs from it at the same time. With a child of 3-4 years, you can create goals and create mysteries, but without delay you will want to create a baby. The New Years are approaching, and therefore, a topic for creativity suggests itself.
What can the baby earn on his own?
The simplest germs with a life of 3-4 years can be prepared under the control of an adult. Controlling does not mean doing everything for someone else, but rather being more patiently on guard. It is also necessary to help, but it is difficult to remember that the process itself is much more important than the result.
In this case, the child already knows the basic colors, dissects geometric shapes, can cut papier herself with scissors, prepare baby ones, and in the process can practice skills and learn new ones.
Cheerful Santa Claus
Required materials:
- disposable plate;
- 2 sheets of white and red colored cardboard;
- cotton balls;
- eyes (purchased or self-made);
- pompom in red color for the nose;
- glue;
- knives.
We prepared the cob for the cob. From the white cardboard a U-shaped figure for the beard is drawn, and from the red cardboard – a cup and lips. According to the width of the workpiece, it is necessary to avoid the plate, and also play the role of a covering.
The cardboard for the beard is coated with glue, and then cotton balls are attached to it, lips are added and left to dry.
I will prepare it in the shape of a bucket, paste it with cotton balls along the bottom edge and dry it on the tip.
Let's get started with the dishwashing, for which we turn the plate over and glue the eyes and nose in the center. You can use purchased ones, and there are not many of them, and make them yourself.
Plastic eyes can be replaced with a fragment of cluster packaging in the form of tablets, glued to a paper, and small black plasticine balls can be placed in the middle instead of glasses. Such preparations can be made for bark, and even with a child of 3-4 years it can be made very little. You can make a red pompom for the nose yourself using thread.
Let's get everything prepared at once and leave the funny Santa Claus who will comfort his creator and all those who are absent.
New wine
Required materials:
- cardboard;
- green farba;
- felt in different colors;
- glue;
- knives;
- satin stitch.

New ones are not the simplest ones for children aged 3-4 years. You need to cut the base for the wreath out of the cardboard; you can entrust the dough to a child.
For the cob, the cardboard blank must be prepared in a green color, and while the mixture is drying, cut out various geometric shapes from felt. Then we glue them with additional glue to the base, add a stitch - and you are ready. Hang your child's creation on the door of the children's room. There will be more rumors about those who are already holy and close.
Yalinka from the old puzzle
In the arsenal of toys of every child there is a puzzle that she no longer plays with, because the picture has come up and not all the details are in place. With the help of your imagination, you can date this speech to a new life. Using the technique, which will be described below, it is possible to prepare different types of viruses with a length of 3-4 batches. Let's take a look at the butt of the Yalinka.
Required materials:
- unnecessary puzzle pieces;
- green is the chervona farbi;
- sparkles;
- rhinestones;
- beads;
- hair;
- glue.
The parts need to be coated with green powder and immediately sprinkled with glitter so that the stench sticks. Using additional glue, glue the parts together so that a link emerges. To be sure, you can use a hot gun (in this case, the mother finishes this part of the work independently, without the participation of the baby). You can add a yellow trunk, for which half of the puzzle piece needs to be painted red or brown, and then glued to the base.
Once the yalinka has been picked, it needs to be decorated. For what a miracle rhinestones of different colors and sizes are suitable.
Such a toy can be hung on the right line, for which you need to make a loop of hair and beads.
Tsikavy virobi for children 3-4 years old
Autumn is the favorite time for all lovers of collecting natural materials and creating masterpieces from them. Winter is different - all materials have to be bought in the store. We present a budget version of the recipe, which is easy to prepare and looks impressive.

Required materials:
- two disposable plates of different diameters;
- cardboard;
- brown farba;
- eyes;
- pompon;
- glue.
On the cardboard we trace the outline of the child's arms 4 times, mark it and paint it in a brown color - the horns are ready. Robimo preparations for vuh.
Disposable plates are prepared and glued together so that they look like in the picture. We add all the necessary parts: eyes, nose, ear, horns. Monster ready! If you make a team, you will get a whole team.
Such viruses, which develop, for children 3-4 years of age, help little ones to express their dreams, spend a fun hour with their mother, and create a festive mood in the daytime.


