Flowerbed - flowerpot "Swan". Meister class. DIY swan made from plywood White swan made from plywood for a plot
Flowerbed - flowerpot "Swan". Meister class.
How to decorate your garden or Pribudinkova plot so that it is beautiful, uncomplicated and the materials fit under your hand.
You will need a five-liter plastic bottle, drill, sand, bandage, plaster putty, spatula, pencil, etc.
Punch a hole in the corner and insert a curved piece there, secure it in the middle with a broken piece and fill it with tile adhesive.
2.
Fill the container itself with sand so that during the process of molding the pots and walls, the shape can be seen.
3.
Thickly mixed putty is applied to the melt.
4.
Place plastic liquid on it and evenly lift the putty from the sides to the top.
5.
Now sew - we take the cut from wet hands, form a small roller and coat the rod with the cork.
6.
Then, with a wet penzlik, we will make a smooth ball.
7.
The ball of putty around the mold measures at least 2 cm.
8.
For krill you will need a mesh of 15 by 30 cm. Having slightly bent it to give the wing shape, we press it into our workpiece at will and immediately fix it with a small amount of putty... Give the putty an hour so that it clumps together. You can choose 10-15 wings, and place a support under the back of the wing.
9.
We put our hands together and take the crumbs in one hand, stick them to the outside side of the wing, and with the other hand we press everything from the inside... We do the same with the other wing. Don’t be afraid, as it doesn’t stick very well, go to the next hour until the other wing is finished and everything will work out for you alternately. Well, we can fix everything later, if the putty dries slightly...
10.
While the wings are drying, let’s start sewing – with wet hands we stick around the rod.
11.
Razved with a wet pencil.
12.
Next we wrap it with a bandage. (I’ll give it to you - since the putty is plaster, then you can use a plaster bandage.)
13.
Now is the time to think about the tail - a small piece of mesh moves at about 40-45 degrees and is fixed by splitting and support.
14.
When the sewing is ready, completely wrapped in a bandage, let the structure hang for about 30 stitches.
15.
16.
To continue the preparation of the tail of a small amount of plaster, spread it with a pencil with the ribs “uphill-downward” and “sideways-towards”, forming small rounded shapes along the bottom of the workpiece.
17.
Work the top of the ponytail at a number of approaches, drawing it from the other balls of the head.
18.
19.
20.
21.
22.
View of the animal's tail.
23.
Side view of the tail.
24.
And the axle is wet, and the finished product... look at it from all sides at this stage and seal everything with putty... In a few years you can lift it and move it to another quiet place on the board. Let it dry for a couple of days, then clean it with a special sandpaper for plaster (it’s a mesh, who knows), then with a special sandpaper-zero, prime it before filling with a primer (without The farb primers come together in little breasts). I filled it with the original farba into two balls, then I shaped the sides and eyes and varnished the two balls.
25.
I have such a strong swan-like axis. Ale, I think you still need to work carefully! Drill a few holes to drain the water and perform a similar process for preparing these pieces to protect your work from destruction.
26.
I forgot to plant the flowers until only the violet was kind enough to invite me to the photo shoot. I think the black-browns are just right for this couple.
27.
Porada: Mix the putty in small portions and very thickly for a short work, and then mix the putty in the process with wet hands and a wet pencil.
You can look at other master classes
Dzherelo - http://uytmir.ru/2583-lebed-kashpo.html
*****************************************************************************************************************************************************************
What will our little plot be like, no matter what it looks like, it will all lie just before us. For those who really need alpine mountains, for those with small stakes, who don’t want to imagine their plot without, we can do all this and a lot more ourselves, it’s good to think through various options - at once, charging, while there’s still an hour.
********************************************************************************************
Try to vibrate the axis of such a swan. Virib is not foldable. To test this virob you will need:
Plywood 3 mm thick without defects, a wooden ruler (others are more precise), a copy, hard olives, thin files for a hand jigsaw, sandpaper, needle files, a wrench for a jigsaw, an awl or a hand drill with a drill bit No. 3. It’s not easy to vibrate, since you only need a few hours to prepare it. When cutting, do not forget about the position of the jigsaw in your hand. Follow the delivery. If you want your hair to look beautiful, don’t rush. After waxing, clean the skin part with the “Medium” sandpaper, then with the “Fried” sandpaper, and clean the other parts with needle files. Follow the rule: part number 1 must be added to another part number 1, part number 2 to 2 parts, etc. Take the material from the beginning, then as soon as all the parts fit well into the required part, glue them together. Gluing requires additional PVA glue. To decorate the viroba, you can cover it with tarpaulin, cut it, whatever color you want, or coat it with “Wood” varnish.


Well, of course, my mother has a beautiful lake with white and black swans on her property. On a quiet, warm evening you can listen to the candlelight and Tchaikovsky’s music. However, it seems that what is more beautiful than a mother’s bird in her hands is less than a pie in the sky. It’s possible to reach the swan, so with a songful effort with your own hands from plastic dances, you can create the same proud bird living in your garden.
Be it assorted swans from plastic dances
Let's wash ourselves that we have already shared these things.
 In the photo below you can see how the swan pot is created from a five-liter container of cured plaster.
 You need to know that there are a lot of options for collecting a swan from plastic dances. Once you have taken up the work, then do it in your own way, and you will end up with yet another victory. Below we will look at some characteristic structures. Don’t skimp on the relishes, and you’ll get the ones you deserve the most. Let's discuss the specifics of the skin proposition and let's inquire about the master class of their preparation.
Three versions of the snow-white bird
The most suitable option is from hardened plywood
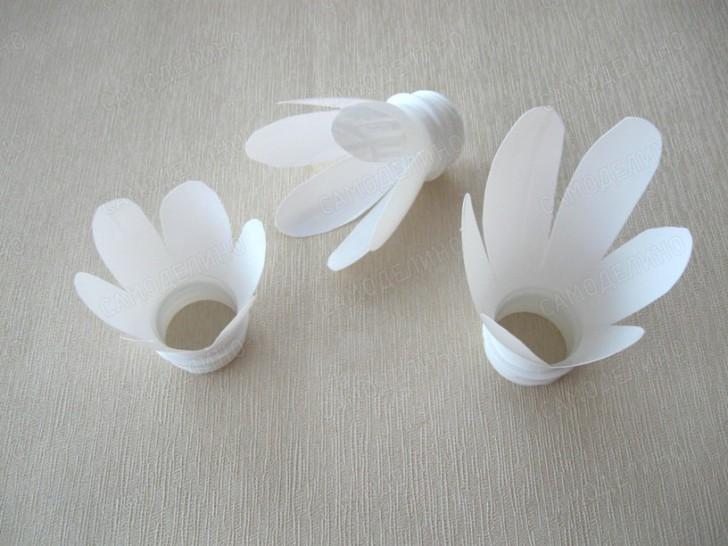
First of all, we would like to tell you about the present. The swan figurine in the photo below is made from hardened plywood and white plastic balls. On a flat sheet, manually secure the feathered bird made of plastic. Not much material is needed. The thinness and thinness of the sheet is well reflected in a sheet of plywood. The swan's body swells into a voluminous shape.
 In general, a subtle vibration is simply created. Pokrokov's instructions:


Light and airy birds with vikoristanny polyethylene spit
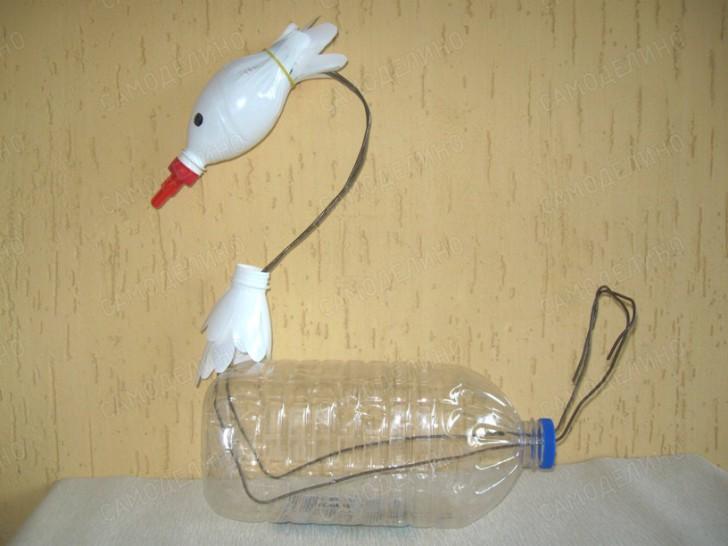
A proud bird for the garden can be collected from a five-liter eggplant and polyethylene spittle. The external appearance of such a guy certainly attracts respect.

 Let's take a look at the master class one by one:
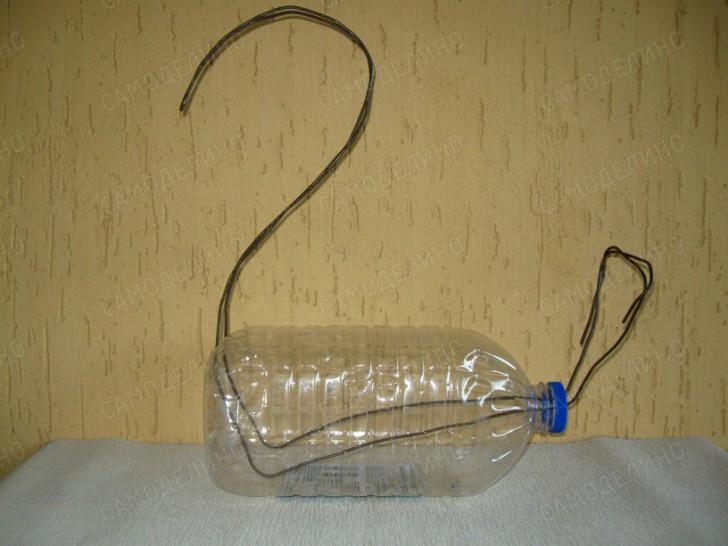
- At the bottom of the sample container, make two openings and drain the drain, as can be seen in the image below. It is important to provide a frame for the virobu's tail. The bottle can be cut through the window, through which you can straighten the hole in the middle of the body with your hand.
- The area is washed in front and behind to create a smooth outline of the bird. The required shape is fixed with tape.
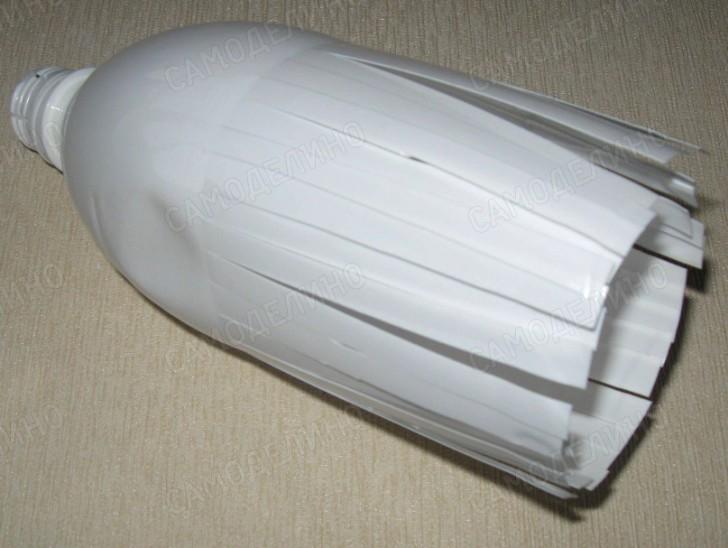
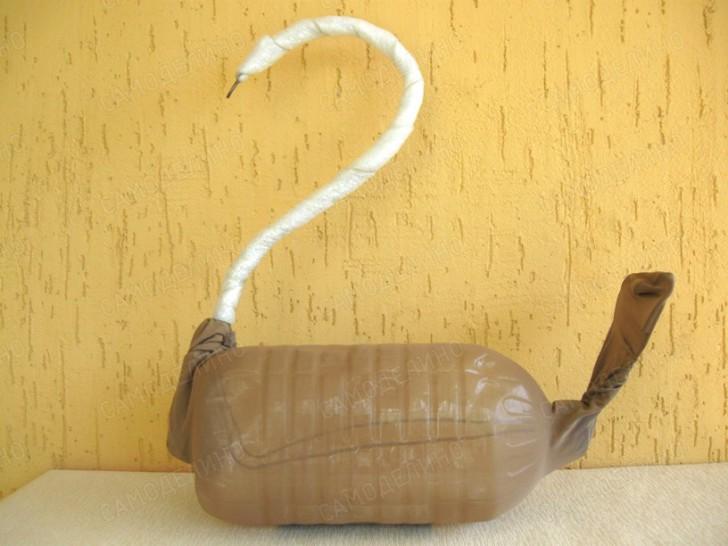
- We will need isolon later. If there is no ready-made butter, you can cut stitches about 7 cm wide from material with a thickness of 3-10 mm.
 The entire workpiece is wrapped with a stitch of isolon. The material is secured with additional tape. The rest helps smooth out the unevenness of the izolon. To mold the bird's head, you need a ball of isolone.
- Now it is necessary to prepare a polyethylene stitch to imitate the feathered bird. For this purpose, cut 70mm wide lines from the melt with a thickness of 100-150 microns. Cut the smudges across to a depth of 50mm with a edge of 5-10mm. Hand fold a bunch of balls to speed up the robot.


- The prepared stitch is used to wrap the tail, body and neck of the bird. Secure the skin wrapper with thin tape. The offensive ball is placed 20mm behind the forward one.

- A bird's eyes can be created manually from black goose bumps. They are sewn to the head at the required location.
- A good dzhoba is made from a red marker. On the body of the marker, make a number of short, late slits to form a wide part of the job. Place the marker on the frame. The swan is ready!

Metal mesh and tire for the great swan
A great bird will come out, as soon as the car tire and mesh are carried by the structure. The tire can be half buried in the ground, or it can be cut all the way through. In the remaining period, the process can be changed to the place of expansion. You can grab it for the winter. The shia is prepared from a dart, like a corrugated hose. The rubber of the wheel and the plastic hose need to be primed so that the farb is properly trimmed.
The bird's head is cut from polystyrene foam. I will prepare to sand with sandpaper, putty and tar. It is better to use putty and water-based paint instead of sealing polystyrene foam.

 Two bird wings are made from plastic feathers attached to a mesh frame. Pieces can be shaped as shown below. They are fastened to the mesh with slices of thin copper dart through the openings in the workpieces. The krill is fastened to the tire with a dart.

 As seen in the picture below, the mesh appears as an oval with jagged edges. A welded mesh with a center of 20x20mm is best galvanized.
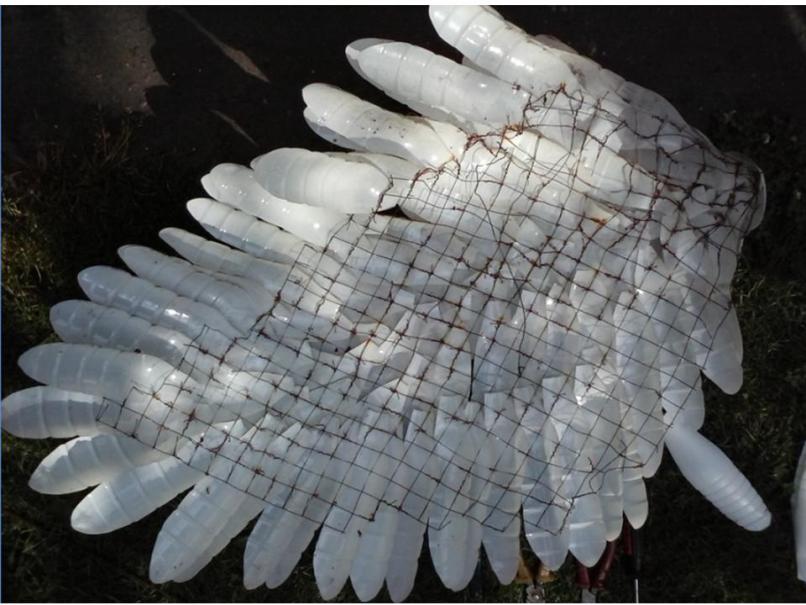
 The front side of the krill looks quite decent. Creel robimo two.
 As you look at the baby below, the wings can be placed behind the help of supports from a heavy pole on the right side of the tire. A great and voluminous swan will emerge from its wings. However, it may not look the best from the rear and you will have to look for a new place in the garden.
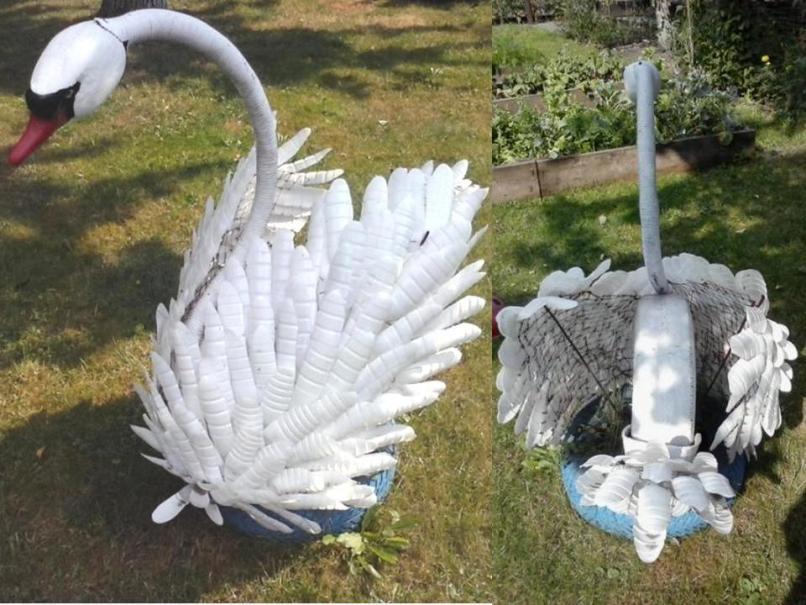
 This scheme requires two vehicle tires. In addition to the wing, it is necessary to prepare the tail using the same technology.
There was a lot of dancing, a lot of dancing - and a living bird might appear
"Taste on the third." Finally, let’s look at the fourth option, which looks wonderful. However, a richer container and even more terpene are required when preparing the product. 
 Master class on making a swan from plastic dances:
- We prepare a blank with a five-liter eggplant and a dart with a diameter of 3 mm. At the bottom of the sample of the dance we pierce it and open it one at a time. The gap can be cut out to straighten the leak in the middle.
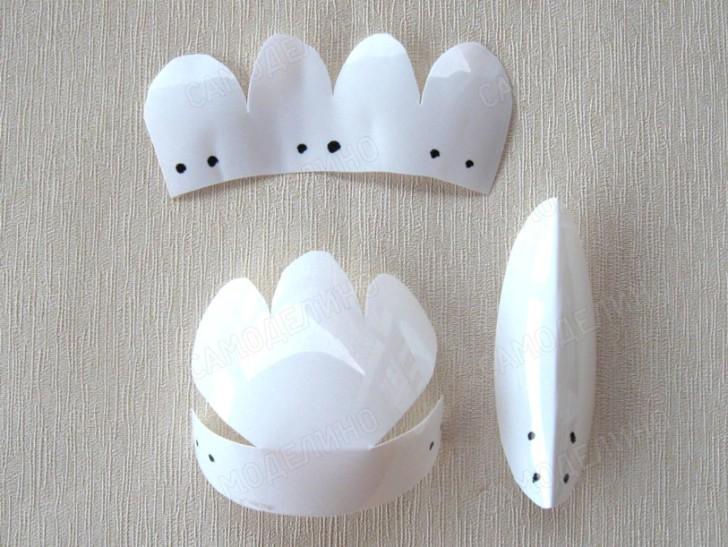
- To prepare the bird's head, take a white bowl with a narrow neck. We cut the bottom part and cut it with a 5mm edge, as shown below.

- To do this carefully, use a red cap and a bucket of liquid sealant. The hole in the sample is visible and inserted into a new red cup.
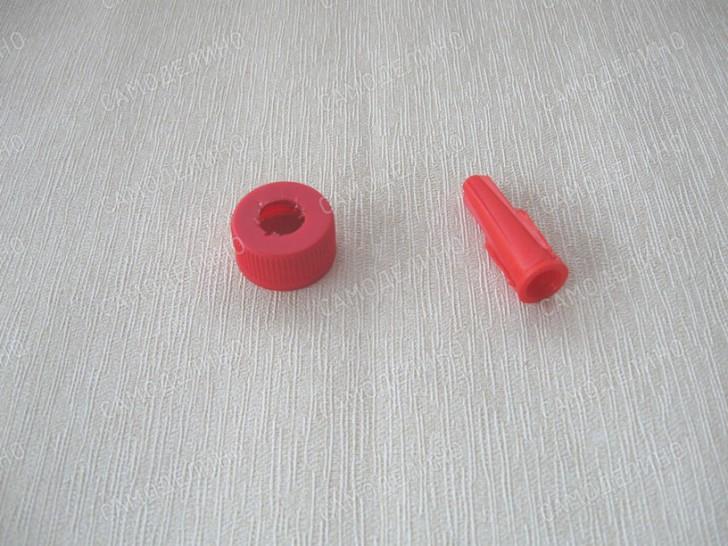
- The eyes are depicted with a black marker. The sounding head is shaped on the thin part of the part, as depicted in the frame. At the hour of folding, a rubber band for pennies is put on the neck, which is then changed into a hair. It is better to melt the edges of the hair with cheese so that the vuzol does not come undone.


- The details are as detailed as in the photo. The stench can be of different sizes, but it is normal for installation in different places.
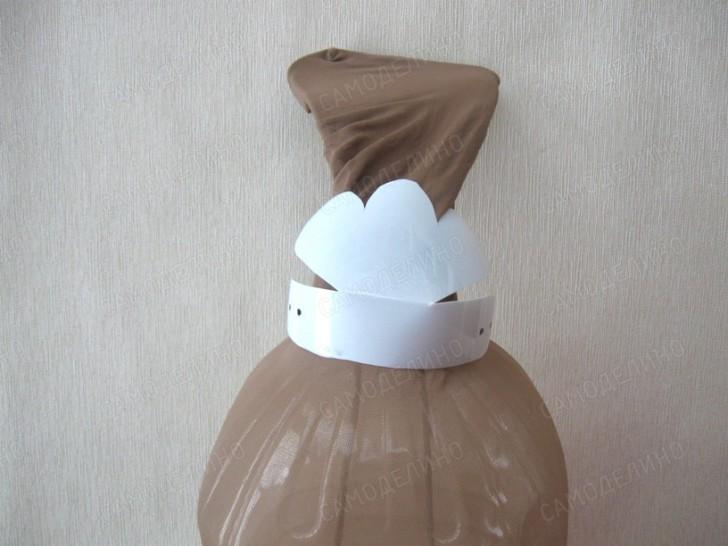
- The image below illustrates how the parts of the head are installed. To finish fastening the head to the upper part of the frame, a copper rod bent halfway is used. Then the knob is cranked, and the middle thread is pulled over the head. The thin thread bends and wraps around the neck of the dance. Dziob starts to spin again.

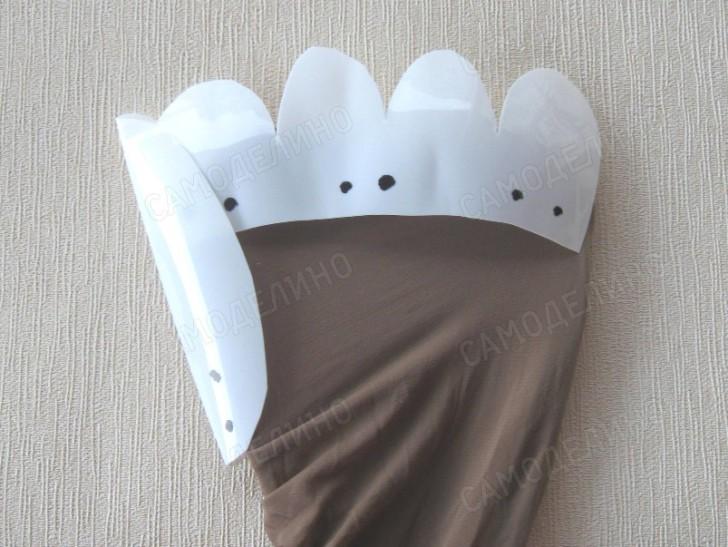
- To ensure that the parts on our parts are evenly distributed and create a smooth shape, it is necessary to wrap the isolon on it. The rest is secured with tape. Instead of isolon, you can vikorist the plugs of the dances with the openings.
- To attach the swan’s “fur coat” to the body of the workpiece, we pull the panchokha. Isolon is placed on the bird's breasts to create a rounded shape. Panchokha is tied with twine.
It’s not your fault to sag!

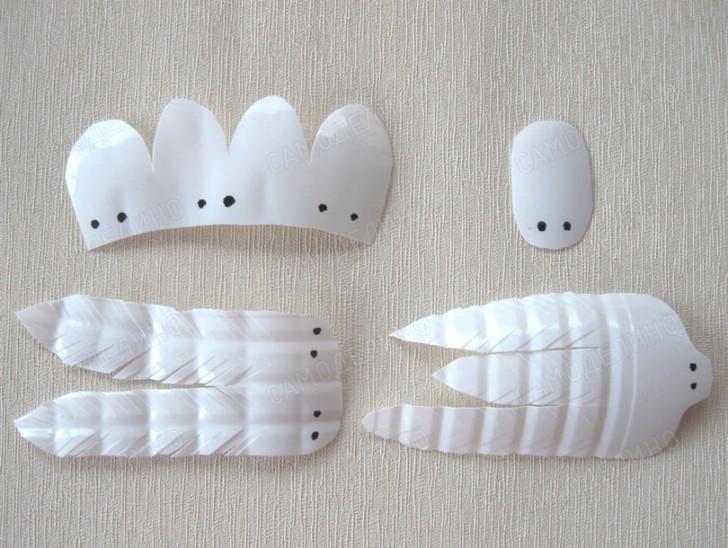
- To prepare the tail feathers, we cut out the parts shown below. Prepare the opening, through the sewn parts to the panchokha.

- The order of installation of the tail parts is shown below.

- The lower part of the tail is covered by a specially shaped element.

- The body of the bird is sequentially sheathed with parts shown below. In the places of death, you can manually vikorize the ovals. Kryla, cut from both sides, cut through the sides with a edge of 3-5mm. The neatness of the robot means the appearance of a future virus.
 We have completed our review of the different options for preparing a white swan for the garden. If you don’t limit your imagination, you can argue as simply as possible and experience the complex miracles of birds.
- Materials for preparation
- Swan made from humic tires
- Swan in the garden made from plastic spoons
- Swan and putty
- Other materials for making a swan in the garden
Often you prepare a very hot swan virib with your own hands for the garden. Today it is fashionable to decorate your life with hand-made decorations: it is elegant, popular and beautiful. With respect, the garden deserves its due. The swan and the flowerbed, for example, carry the energy of the ruler and bring you success, and it is not for nothing that they give such great respect.
Figures of swans, sculptures made of wood, clay or wood, will decorate any dacha plot.
Especially capable people can create a decorative element to their own taste, adding new designer touches and special embellishments. The fruits of the powerful practice are to appease the eye and self-love. Any untidy creation can turn into a masterpiece of mystique. Thoughtful winemakers began to prepare sculptures from available materials. This is important for trendy, environmentally friendly decoration. Without any special materials or costs, you can create a unique decoration for your garden.
The swan is the embodiment of all positive qualities and characteristics, so many people want a sculpture of their mother in their garden. The road of ready-made vegetables and doubt their sweetness and the term of service will tempt you to think and put your imagination into action.
Materials for preparation
To prepare a sculpture for the swan garden, use hand-made materials. This may include sealed gum tires, tires, plastic balls, spoons, bags, wood, stones, household materials and other items.
Swans can be collected from pellets made from plastic dances.
There are also options for viruses from plastic balls, which are durable and universal in Vikoristan. Vicor tires can be subjected to similar hardening, as long as the material is properly cut and prepared. Such sculptures can have practical meaning, the fragments can act as a flower bed, a flower bed or a flower bed, or even an aesthetic embellishment that echoes the theme of the garden. Polyethylene bags are not classified according to the terms of service, but may compete with other materials.
Wood is a less durable material that emphasizes the skill and precision of hands. It is not available from Vikoristan to unqualified accountants. Stones, through material waste and physical forces, compete with other materials, but suffer from durability, sophisticated style and elegance. Potential mixtures may be useful in this regard, even if they are available for preparation and processing; We would like to respect this by adding gypsum and cement materials.
Turn around to the spot
Old car tires can be given a new life if they know how wonderful it is to sit in the garden. So, you can prepare one of the fairy tale characters. Swan made from gum tires is the most affordable and most economical product for decorating the garden, and even old tires are needed here. Chantingly, the skin creaked in the richly populated booths of one of these. So, to prepare a swan from tires, you need to get a tool. For the cob, prepare a working surface and cover it so that it can be processed without obstructing either the vibration or the working space.
The next step is a thorough selection of material. Next, select the worn tire itself with a late model for the ease of working with it and preparing the finished product. Then it is necessary to carefully clean them from any debris, saw or other defects in the robot, and dry them. So, we prepared the material for further processing.
Diagram of a swan from a tire.
Then cut the surface of the tire into pieces and cut it along the contour with a jigsaw. To prepare the virob, you will need another metal rod, drill, grinder and pliers. These handy tools will be available from the Lord.
The marking is carried out on a cleaned wheel. The first thing you need to do is apply the contour of a newborn swan and cut it with a jigsaw. You can quickly cut it with a sharp knife, a grinder and other hand tools. However, it is important to remember about safety and not lack basic rules in order to avoid injury and other inconveniences. Proceed as far as possible from head to tail using parallel lines for ease of use of additional tools. The edges of the trim need to be trimmed - smoothed with a knife or grinder.
Then it is necessary to turn out the twist and form a swan coat, a vigine kril and shiya. This will help to create a metal rod or drill, fastening the base of the tail and the back of the tube. Then it is necessary to give the virus a new look, having grown up with the singer of color, having seen it with his own eyes. Installation of the creation is the final stage of preparation. For this purpose, you can quickly use another tire or spinning one.
We fix the swan and decorate it with lush foliage and barvy flowers. Apparently, in nature, swans are given to kohans, so it would be appropriate to prepare a pair of swans. It’s wonderful to decorate the garden, stakes, flower beds, plant stumps and add decor.
Turn around to the spot
Plastic spoons are a very cheap and valuable material. So, you need to stock up on plastic spoons of one color, eggplant, and white, peel them and cook them beforehand.
Swans for the garden can be made from plastic spoons.
First of all, we need to build a swan frame on which to attach the spoons.
You can make it from a plastic bowl, or wrap it in bags, paper and tape, giving it shape.
Then you need to form the silhouette of a swan, directing the head, straightening the wings, and pasting the silhouette with spoons on the inside of the shape.
This creates the effect of plumage and embellishes the appearance of the bird. To do this, you need to see it in a different color and paint your eyes. The virus can be detected on a tree stump or other part of the garden, subject to windy weather and wood.
Turn around to the spot
Swan for the garden with putty is the most handy and most beautiful method, the fragments are painted with a white color, and you can mold the wings and plumage yourself, making the appearance as similar as possible to the real swan. For which you need to take:
- putty knife;
- putty;
- plastic 6-liter dance;
- water;
- bandage;
- metal rod;
- metal mesh;
- Penzliks;
- spittle
To prepare the swan with putty, you will need a climbing rod and a large plastic ball.
Now we are preparing a working area: we will spread out the spittle, instead of splitting it, we will put the spittle on the animal - this will be the basis on which the animal will need to place a plastic flap, cut so that the lid is lost in place and f I bit a metal rod and sewed a swan's head.
Sink into the dance on the surface - earth and sand, due to the importance and richness of the middle of the sculpture. Open the door and secure the curved metal rod - the next big thing. Next, mix the putty and apply it evenly from the base to the base, forming the feathers with your fingers, attaching the metal mesh in place of the krill, giving natural vigin. Then, with your hands and wet with water, wet the bristles and smooth out the hair.
Shiya deserves a lot of respect. To secure the putty to the metal rod, it is necessary to carefully press it with your hands and fix it with a bandage. Apply a thin ball of putty evenly on top using a pencil.
We form a wig, a dove, a ponytail, let the bead dry thoroughly, give it a single color with acrylic paint, paint the dot and eyes, and then seal it with varnish. The swan is ready to decorate the garden. It’s no longer possible to plant the water, fill it with water and other surfaces. It is important not to be afraid to experiment, try out all the decor options, and let your imagination run wild. The same swan is in a cast.
Turn around to the spot
Swans made from plastic bags turn out incredibly beautiful and voluminous. For the cob, a base frame is prepared, onto which a cut-up bag of one color is attached. The eyes of a swan are seen in color. We are grateful for the preparation of plants from gypsum, which, when used correctly, is an environmentally friendly, excellent way to beautify the garden.
Durability of service, wonderful modern appearance – these are the parameters of the stone. Pebbles and granulated stones that can be fixed with cement and used for the garden are ideal.
You can fill the volume with earth and plant flowers, form a wickerwork, a flowerbed and a wonderful flower composition of their different colors.
Swan for the garden (part 1)
Would you like to receive your new publications by email? Subscribe to the newsletter!
Dodati in attire | Remaining publications of the author 12/13/2013 Laznya at the dacha (economy option) 12/05/2013 Insulating the shed, how to stay for a couple of years... 12/02/2013 Delicate topic, because I will have a wooden toilet at the dacha... 11/17/2013 How to stay ganok 1 on 1 . Vimoshennya near the booth |
|||||||||||||||||||||||
If you want to decorate your garden plot, then watch the master class photo on how to make a swan with your own hands.
Watch more materials from this section: |

www.sami-svoimi-rukami.ru
Do-it-yourself swan for the garden from plastic dances - master class, diagram and instructions for preparation
Well, of course, my mother has a beautiful lake with white and black swans on her property. On a quiet, warm evening you can listen to the candlelight and Tchaikovsky’s music. However, it seems that what is more beautiful than a mother’s bird in her hands is less than a pie in the sky. It’s possible to reach the swan, so with a songful effort with your own hands from plastic dances, you can create the same proud bird living in your garden.
Be it assorted swans from plastic dances
 Let's wash ourselves that we have already shared these things. You can find out how you can make a flowerbed swan from plastic dances from a special article.
 In the photo below you can see how the swan pot is created from a five-liter container of cured plaster. About this silicone material.
 You need to know that there are a lot of options for collecting a swan from plastic dances. Once you have taken up the work, then do it in your own way, and you will end up with yet another victory. Below we will look at some characteristic structures. Don’t skimp on the relishes, and you’ll get the ones you deserve the most. Let's discuss the specifics of the skin proposition and let's inquire about the master class of their preparation.
Three versions of the snow-white bird
The most suitable option is from hardened plywood
First of all, we would like to tell you about the present. The swan figurine in the photo below is made from hardened plywood and white plastic balls. On a flat sheet, manually secure the feathered bird made of plastic. Not much material is needed. The thinness and thinness of the sheet is well reflected in a sheet of plywood. The swan's body swells into a voluminous shape.
 In general, a subtle vibration is simply created. You can read about how to make wood from plywood in the following article. Pokrokov's instructions:

 Light and airy birds with vikoristanny polyethylene spit
A proud bird for the garden can be collected from a five-liter eggplant and polyethylene spittle. The external appearance of such a guy certainly attracts respect.
 Let's take a look at the master class one by one:

 Metal mesh and tire for the great swan
A great bird will come out, as soon as the car tire and mesh are carried by the structure. The tire can be half buried in the ground, or it can be cut all the way through. In the remaining period, the process can be changed to the place of expansion. You can grab it for the winter. The shia is prepared from a dart, like a corrugated hose. The rubber of the wheel and the plastic hose need to be primed so that the farb is properly trimmed.
The bird's head is cut from polystyrene foam. I will prepare to sand with sandpaper, putty and tar. It is better to use putty and water-based paint instead of sealing polystyrene foam.
 Two bird wings are made from plastic feathers attached to a mesh frame. Pieces can be shaped as shown below. They are fastened to the mesh with slices of thin copper dart through the openings in the workpieces. The krill is fastened to the tire with a dart.
 As seen in the picture below, the mesh appears as an oval with jagged edges. A welded mesh with a center of 20x20mm is best galvanized.
  The front side of the krill looks quite decent. Creel robimo two.
 As you look at the baby below, the wings can be placed behind the help of supports from a heavy pole on the right side of the tire. A great and voluminous swan will emerge from its wings. However, it may not look the best from the rear and you will have to look for a new place in the garden.
 This scheme requires two vehicle tires. In addition to the wing, it is necessary to prepare the tail using the same technology.
There was a lot of dancing, a lot of dancing - and a living bird might appear
"Taste on the third." Finally, let’s look at the fourth option, which looks wonderful. However, a richer container and even more terpene are required when preparing the product.  Master class on making a swan from plastic dances:

We have completed our review of the different options for preparing a white swan for the garden. If you don’t limit your imagination, you can argue as simply as possible and experience the complex miracles of birds.  We wish you good luck in your self-realization and here is a video for help.
samodelino.ru
How to create garden seeds with your own hands, a collection of the brightest ideas
 For most people, a dacha or garden plot is not just a city and garden beds, but also a favorite place for refurbishment. Think for yourself: being in nature can be a good way to relax and completely relax from the hustle and bustle of the world. In order to decorate and decorate the place of their home, people make various beautiful things with their own hands for the garden.
Ideas for the dacha, how to create a cordon for flower beds or beds, vikory and plastic dances.
The hand-crafted creation of viruses will not only allow you to realize your creative potential, but also encourage children to work. Of course, you can buy ready-made decorations, otherwise you will be able to implement great ideas for the garden and city with your own hands!
 Good decisions, for example, would create a cordon for flower beds or beds with what would seem like old plastic dances. For this simple task, you will need to use both colored and non-colored dances.
To install a fence, you need:

Important! Arrange the dances as widely as possible, do not deprive them of light.
As you know, the work is not at all complicated, then you will have a stand and an original fence for a flower bed or bed.
Bdzhilka z plyashki
An excellent option for decorating a home is a plastic bottle. To create such a decor you will need:

Important! Vicorize acrylic fabrics - other types of fabrics will take longer to dry and lie more flatly on the surface of the dance.
By following simple instructions, you will pick up miracle sprouts for the garden, made with your own hands:
- Take the golden wings from a plastic bottle.
- At the back of the building there are small openings in the dance of the wings that came out, securing them with duct tape.
- Paint the body of the bjilka: paint the dance in the black farb, and after drying again, paint the fat dark spots.
- Now proceed to painting the muzzle of your forehead. In the background, immerse yourself in a black crust from the dance, paint your eyes with white farbs, and your mouth with red ones.
- If it is a bagel, then paint the outline on the circles.
 Axle and that's it, your body is ready. As you have done the conversion yourself, there is nothing foldable about the jigs prepared from plastic flaps.
 Lamp made from dances
If you are throwing away empty glasses, do not rush to throw them away. Such a dance would make a wonderful lamp, especially since it has an unusual shape. For this you only need a little time, accuracy and a few simple materials.
Good afternoon, dear friends, today you are wondering how you can make a flower pot for your garden with your own hands in the shape of swans. Whether a plot, a garden or a children's playground, you can decorate it beautifully, for which you need to add a little imagination. You can also decorate our plot with flowers, as well as with flowers and garden sculptures. Through marriage, it is not possible to put sculptures or plant flowers on a skin plot; therefore, for such purposes, it is best to make flowerpots with your own hands. Even if you have both the vibrate and the planting of flowers. There are differences in both shape and size, but most often they are created in the form of a swan. The swan is very flaming, a fine bird, which does not deprive anyone of anyone. Chantly, most often in the field and you can catch this charming bird. The swan is made from various materials: from tires, plastic balls, cement, gypsum, polystyrene foam, etc. If you would like to create something, then on the site you can find a selection of these materials. And now let’s turn to those and take a look at the report of the master class from the preparation of the flowerpot in the appearance of a swan, which will decorate your bedside table. The author of this master class is Alla Korobko. Alla clearly demonstrated how you can create a swan with your own hands.
To prepare a swan you will need:
* Plastic 5 l. square-shaped dance.
* Climbing rod 0.6 mm.
* Bandage.
* Starting putty.
* Small spatula.
* Penzlik.
* Capacity for mixing the mixture.
* Water.
*Pisok.
* Tile adhesive.
* Polyethylene melt.
* Filled mesh.
* Emery paper.
* Primer.
* Farba.
* Varnish.
How to make a swan with your own hands:
To prepare the swan, we need a taka axle, starting putty, Alla vikoristala taka axle.

Using a plastic pad, we cut the mountain as in the photo and pour sand there. First of all, we take the climbing rod and bend it at the sight of the door. The sample has an opening for the hole and inserts curved steel stakes into the hole. It needs to be fixed in some way in the middle, for example, you can twist the whole bit or stone and lay it with tile adhesive.

Now we're pouring sand in there. Alla chewed the sand until it was wet, and then put it in the dance. Easily expandable by adding sand to the white side to give a more natural shape to our planter.

Prepare a working mixture, take polyethylene casting and add it. Then we mix the putty evenly. We take a spatula and apply another ball of putty onto the melt, which will be the bottom for our flowerpot.

If the ball missed, we place it on a new frame from the dance. We continue to smear the putty, but also from the bottom along the edges. We distribute the excess putty evenly and spread it along the edges from bottom to top. The spatula must be soaked in water during operation to ensure that the putty does not get hot and is easy to work with.

When I got to the surface, they missed it all the way down to the neck. We wet our hands and take some of the putty from it, form a small ball and coat the base of the rod with the cork.

Wet the penzlik near the water and use it to level the surface.


The krill starts to become timid. We take a mesh of 15 cm by 30 cm and bend it slightly, give it a wing shape and press it slightly into the preparation as if at an angle.

Once the mesh is placed in the frame, it is fixed with a small amount of putty. If you have smeared too much of it for 15 minutes, you need to make sure that the putty has accumulated to about 10-15 layers. You can sing while you rest and drink tea. It will be necessary to create some support under the back part of the wing.

Once the krill have gathered, we begin cooking. We wet our hands with water and take a little bit of putty in them. We smear the putty with our hands on the outer side of the wing, and with the other hand we need to press it on the inside side. So everything works itself out with another wing. If the putty doesn’t stick very well, try to make another wing in the meantime, don’t worry, everything will come out smoothly. And all the shortcomings, we can fix them once the putty dries a little.

If the wings have been coated and it takes an hour for the putty to accumulate, you and I will start sewing at that hour. With wet hands we form a small roller and secure it to the rod.

Once you have coated the neck, soak the foam in the water and use a wet foam to smooth the surface.

If we have leveled most of the surface, take a bandage, wash small cloths and soak them in water. Then we wrap a wet bandage around the neck, squeezing the parts with our hands. So we work until the end of the dart, at the end we flatten the look of the job and then wrap everything with a bandage. That's all for now, let's go back to the beginning, the stench has dried up within an hour and we can fill up all the little bits.

Also unforgettable about the tail. We take a small piece of mesh and bend it around 40-45 degrees. With the help of putty, the tail is fixed to the supports.


You need to fix your head and neck and give it an hour so that everything is collected, you can go for a walk for about 30 minutes.


The very top of the tail is coated with a number of approaches, drawing from the prepared balls of the other head.

While the tail is drying, apply another ball of putty to the neck using wet hands.


So we get to the head, timidly all the same. We just want to see and be like someone else.


Then, using a wet pencil, we smooth out the edges.

This is what the tail of a fire looks like.

And so from the side.

That's it, the swan flowerpot is ready. Let's take a look from all sides and some of them and smooth them out with putty. Then we’ll find a place so that our pot will dry well and it won’t be a terrible thing. After a few days, our planter may dry out thoroughly, and then the swan will use the emery paper. Then we need to prime the paint with a primer, and then apply the farb. If you don’t apply the primer, the farb will come together in little chunks. When it's dry, we'll use the original mixture to smear it into two balls. Next we'll do the job, oh. When the farb is dry, apply varnish just like that.

Axis and all, marvel at the fiery swan of the Vyshov. Using additional drilling, we make a bunch of trees to drain the water and then prepare them to protect the pot from ruining.

It’s too late to plant in new flowerpots, I think that dwarf black-browns will look very beautiful in them, but what else would you like for planting?

Porada from the author: Apply the putty in small portions and very thickly. You can get it wet again.
ROB WITH ME, ROB LIKE ME, ROB BETTER THAN ME! And remember, “Don’t stop yourself from creating, don’t let it come out crooked, your stupid motives can’t be repeated by anyone!” as M. Tsvetaeva said. Good luck to everyone! I am delighted with the swans-pots at your viconn!

Swan flowerpot for the garden

It wasn’t long before Allie’s flowerpot, which looked like swans, gained popularity on the Internet and a lot of creative people also began to create swans. Axis and Lydia Tkachenko also planned to create these miraculous swans for her garden. This wonderful flowerpot will also brighten up your garden and put you in the mood. Three times 5 l. Using a plastic bowl, Lydia made a beautiful swan-shaped flowerpot for her garden with her own hands. Let's take a look at it the same way.
To prepare the swan we need:
* Plastic dance 5 l.
* Bandage.
* Putty knife.
* Penzlik.
*Pisok.
* Zalizny drit.
Method of making pots:
We take a plastic flap and make an opening on one side all the way through. Then we take the thread and insert one end at the neck and fasten it. Let's give the shape. If you dance better, get sand, so it will be easier to dance. We place the melting pot on the work area and apply a small amount of putty on it and immediately place our planter on this ball of putty. We begin to coat our planter with putty from the bottom, and having coated the little bits we move on to the bottom.

We also need to create wings, we take the mesh from the screen and attach them to the base.

Then step by step, carefully wrap it with a bandage to make it easier to clean. When the pots are ready, prepare them and cover them with varnish.


You can plant flowers in ready-made pots or simply decorate your garden.


Copyright © Uvaga!. Copying text and photographs may only be used with the permission of the site administration and by inserting an active posting to the site. 2019 All rights reserved.


