Do-it-yourself wooden pidlog repair
Repair under the log may be cosmetic or capital. For example, periodically that polishing is carried out before cosmetic repairs. Let's take a look at the cosmetic elements and the aftermath of a major overhaul.
Major overhaul
Steps:- dismantling of loose boards;
- znyatya lag;
- beat the line to the "horizon";
- fastening of new logs and boards;
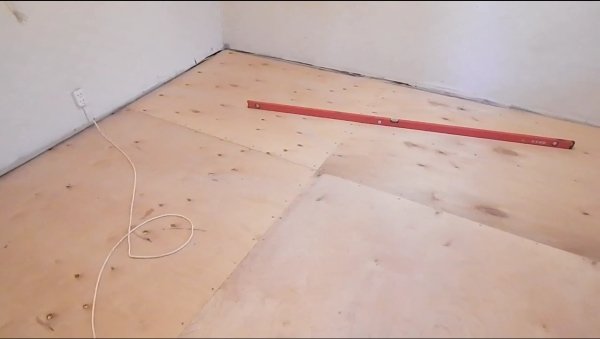
- forming pokrittya from plywood material or chipboard.
- polishing, polishing pidlogs;
- farbuvannya;
- finishing touch.
1. As the deacons of the doshka pidlogs recognized the rot more or less often, it is recommended to replace them with new ones. That's why we're in front of doshka and lags. As in the process of dismantling, flowers are traversed - they are thrown out, so it is necessary to mount a new coating on the screws.
2. Yakshcho became a pіdlogi vymagaє znyatya vsіh boards and lag, before forming a new pіdlogi, it will be necessary to break the line of the horizon. Vidbivka is carried out in order to lay the boards in parallel to the horizon, avoiding curvature.
4. After the complete drying up of the tree, the logs grow stronger. For this, it is possible to attach them to the walls with dowels 10 by 100 mm. Like lags sag over the base, creating piping with wind between them, skin 50 centimeters.
5. Laying out the logs on the underlay, leather 50 cm under 90 degrees, pulling the threads, fixing the logs with dowels there, de є stop.
6. Krіpimo doshki for the help of the rіzіv themselves for the village. Vrakhovuychi, that the screw needs to be rebuilt 1.5-1.8 times more, the lower part of the board.
Respect! To pay respect, that the pidlog may have been given to dry out and rip off itself on the sticks, so that the reason may be found in the future, the necessary gap between the boards in the installation process.
7. Change of chipboard over planks. This stage is important for laying down a layer of laminate or linoleum flooring. Adzhe similar building materials are fixed only on a flat surface. Screws are used to fasten the plywood coating.
Cosmetic option
Do not start when defects are revealed, it is necessary to transfer the sublog again. It is often sufficient to carry out cosmetic repairs and fix defects.1. Removal of nervous state
With your own hands, you can work out the underlay perfectly equal. As unevenness is small, it’s hard to finish the job with a grinder. If the log is too old, then you can take it and turn the boards with a planer, it’s possible to expand the logs.
Respect! In front of the sanding machines, it is necessary to drown the upper part of the flowers, screws and other fasteners as much as possible, so as not to zip the tool.
Significant unevenness of the logs can be corrected by zastosovuyuchi new technologies, such as a screed. A warehouse for a screed can be added to any budivelny store, picking it up to the type of pidlog. The sumish is easily hardened and it is recommended to apply it with a ball, which does not exceed 10 mm. Іsnuє kіlka variantіv for shvidkogo zaspechennya statі іdealої івnostі.
One option is to fill all the empty spaces between the lags for an additional foam plastic and expanded clay base. The second is the lining of fragments in ruberoid material, hardboard or plywood boards under the logs.
2. Filling gaps
Self-supporting mortgaging of gaps is a simple job, for which you need a putty, a spatula and a hammer. With this putty, you can prepare it yourself. To finish the sum of money from shmatochkiv paper, PVA with additional stains, like a vіdtіnkom іz kolorom pіdlogi. Before the cob, it is necessary to resolutely prepare the processing zone - to clean all the cracks, allowing them to see the saw, cut, wood.
Shchilini is filled with self-made paste or putty, spread with a spatula, we create a single raven with a flat one. For dacha residents and for a long time vykonannya laying cracks - the stench can be quickened using the thin plank method. For this, PVA glue is poured into the gap, then a wooden blade is installed at the gap, after which it is hammered with a hammer, without any strong blows, so as not to zip the pidlog.
So you can just move the boards wider, so that you can use the space between them, or else it will take more than an hour to work, because the boards will have to be dismantled and replaced with new ones. If the gaps are too rich - the shifting of the boards will take less than an hour and zusil. Chim is the foundation of all possible spaces.

3. Re-arrangement of zip slabs and logs or replacement of boards
To replace only a few parts or elements of the sublogs that served your term, dismantle them. To carry out the work, the following tools are necessary:
- hammer, flowers, or else more fastened, olive, saw, wood trimmings.
4. Usunennya creak
Nayakіsnіsha derev'yana pіdloga dries up for an hour and sees unacceptable sounds under the hour of the step. Even if it’s not memorable in the day, then at night it’s easy to walk like this, not being afraid to disturb the sleeping household. The reason for the creak at the boards, German fastened on the logs. To put inacceptable sounds there, it is necessary to drive in flowers, a wedge or a fastening element.
Three ways to use a creak in a p_dloz_:
- The first way is a wedge from the bottom - it is possible to get to the floorboards from the bottom on top or to the bottom. Todі one of the quiet, who repairs, posterizes the lower tier, like a board to creak, if the beast passes through them. Knowing the reason between a board and a beam to drive in a wooden blade;
- Another way is a screw to the beast - since there is no access to creaky boards from the lower tier, then it is possible to fasten them from the upper side. For which you need screws with a diameter of 3.7 cm (No. 8). At the undesirable doshkas, open the twines over the beams, bazhan under the hood, for greater supremacy. The boards are screwed with screws, the heads of which we then mask and grind with grinding attachments after hanging;
- The third way is to seal the gaps with graphite - to make the boards creak like a weakly fixed plank. Sounds can be seen from the boards when rubbing. Walking along the path, and having revealed the “brightness of the world”, you can sizzle in the gaps between the boards with crushed graphite or talc. Also, the boards are fixed with screws from the attached (hidden) top.
5. Farbuvannya - finishing part of the work from the repair process.
Farbuvannya comes in at two. Sequence of vikonnannya farbuvannya:
- prepare the surface;
- clean її in the mud, wash with warm water with a sweet;
- scrape through the surpluses of the old farby with a spatula;
- to fix the boards that have been stolen;
- cut knots;
- drive in deeper the heads of the carnations that have wobbled;
- clean the surface and the cracks in the saw, wood;
- clog the cracks with thyrso, cover them with putty;
- the surface is polished and primed with drying oil;
- after drying the primer (2-3 days) the fermenting is done.
The underlays can be painted with varnish after hanging another farby ball, to give a shine and a decorative gloss effect.
Remontovana, pofarbovana to serve for a long time, so as not to damage it with abrasives, protect from undermining, to trim the optimum temperature and moisture conditions in the application.